Windows 11
微软最新的操作系统

如何使用适用于 Android 的 Windows 子系统在 Windows 11 上获取 Google Play 商店和 Gapps

方法 #1:安装预装 Gapps 和 Play 商店的自定义 WSA

使用 WSA 获取 Google Apps 和 Google Play 商店的一种更简单的方法是使用预先安装了 Gapps 的预修改 WSA。此 WSA 由名为 Rageman666 的 Redditor 共享。下载后,您可以使用下面给出的 mod 使用您的 Google 帐户登录 Google Play 商店。(不过,如果你只想正式安装WSA,然后自己承担安装Gapps的复杂方法,那就看下面的方法2。)

你需要什么

  • 修改后的 WSA | 下载链接镜像|镜像 2
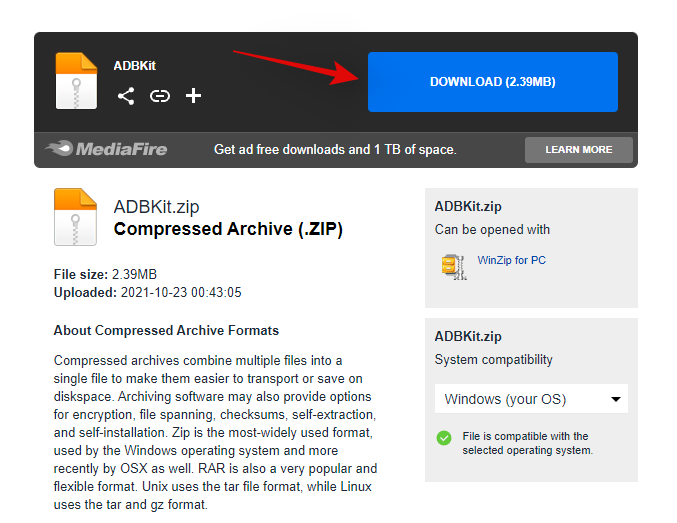
  • 亚行工具包| 下载链接
  • 重要提示:如果在继续本指南之前安装了原始 WSA,则需要从系统中卸载原始 WSA。 

分步指南

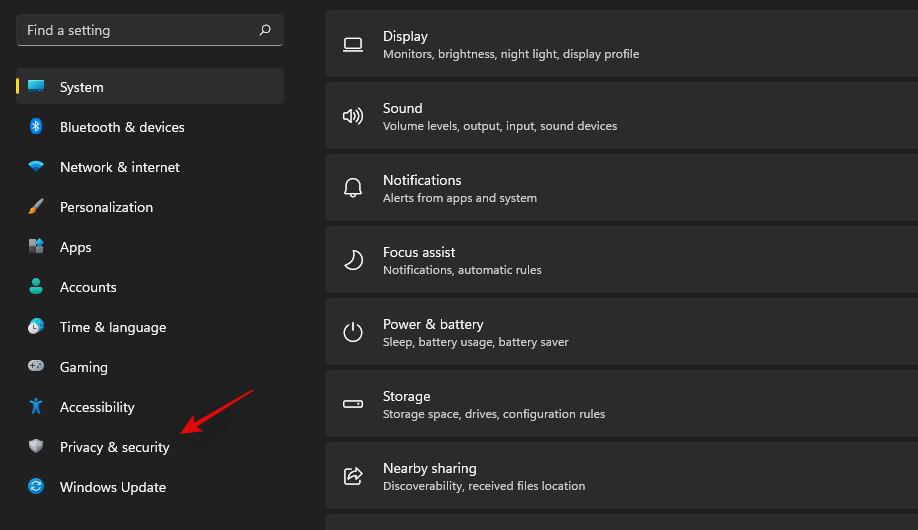
我们首先需要在安装 Windows 11 时启用开发人员模式。按Windows + i键盘上的 并从左侧边栏中选择“隐私和安全”。 
windows-11-install-gapps-wsa-batch-1-1

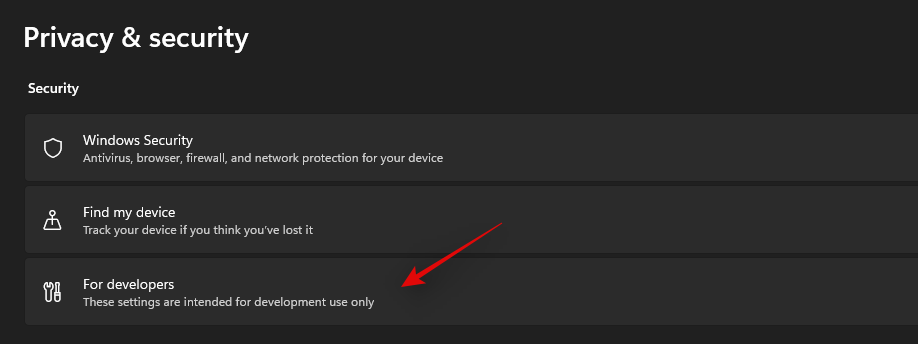
单击右侧的“对于开发人员”。 

windows-11-install-gapps-wsa-batch-1-2

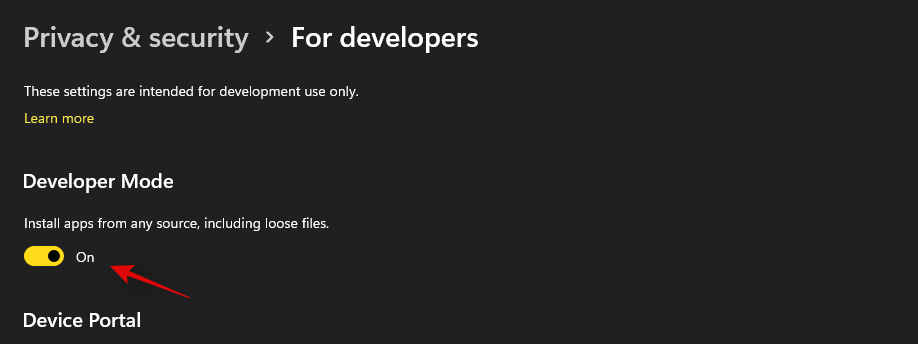
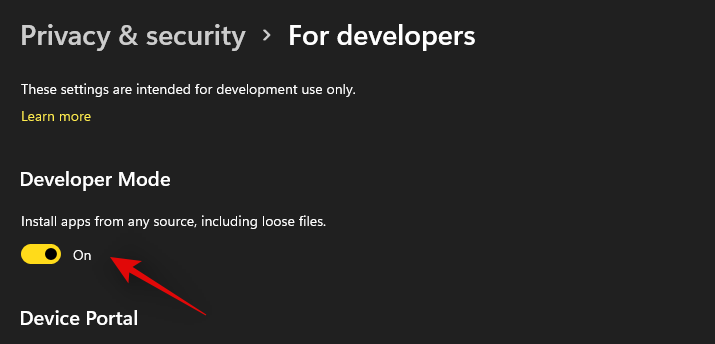
单击并打开“开发人员模式”的开关。单击“是”以确认您的选择。  

windows-11-install-gapps-wsa-batch-1-3

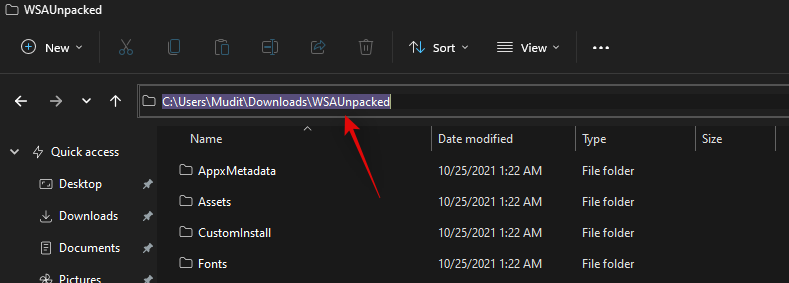
现在将上面链接的 WSA 下载到本地存储中一个方便的位置。将文件解压缩到名为“WSAUnpacked”的新文件夹中。单击“WSAUnpacked”文件夹中的地址栏,然后将路径复制到剪贴板。
windows-11-install-gapps-wsa-batch-1-6

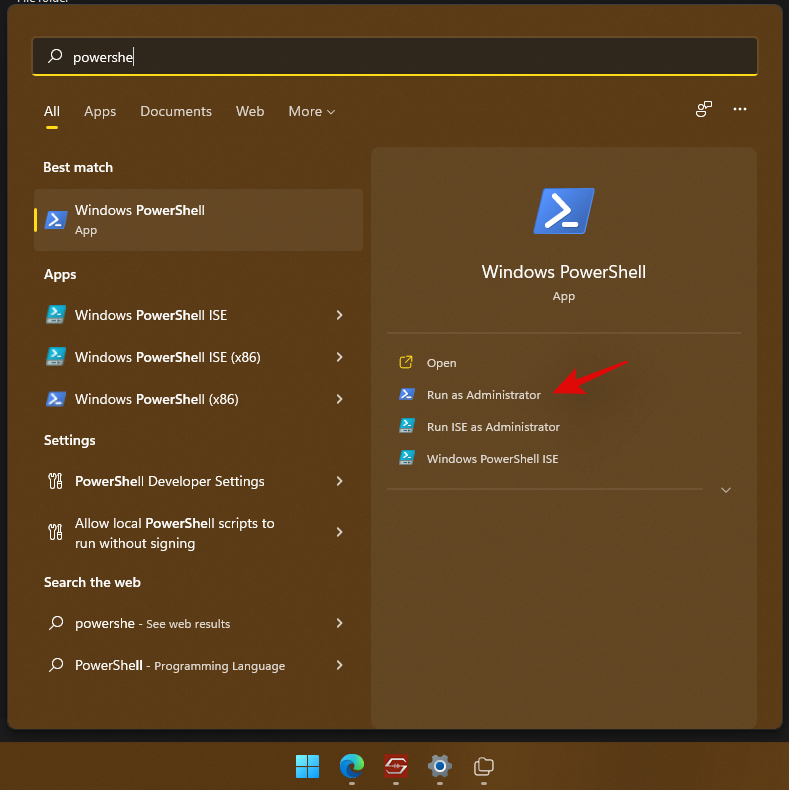
按下Windows + S键盘,搜索“Powershell”,然后在搜索结果中显示“以管理员身份运行”后单击“以管理员身份运行”。
windows-11-install-gapps-wsa-batch-1-5-1

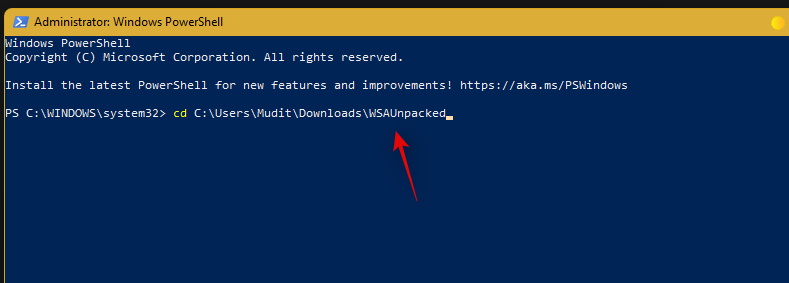
输入以下命令并将 PATH 替换为我们复制到剪贴板的路径。确保从粘贴的路径中删除引号。 

cd PATH
windows-11-install-gapps-wsa-batch-1-7-1

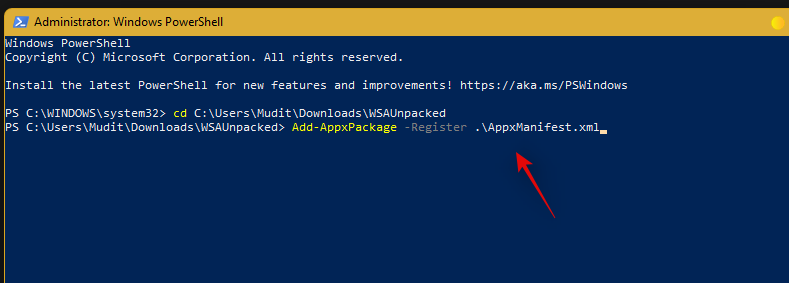
现在输入并执行以下命令。

Add-AppxPackage -Register .\AppxManifest.xml
windows-11-install-gapps-wsa-batch-1-8

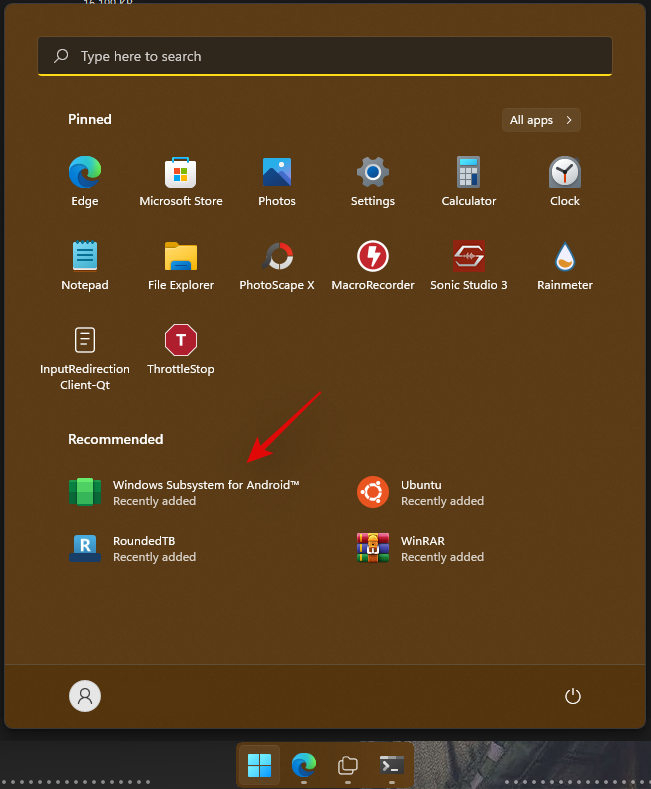
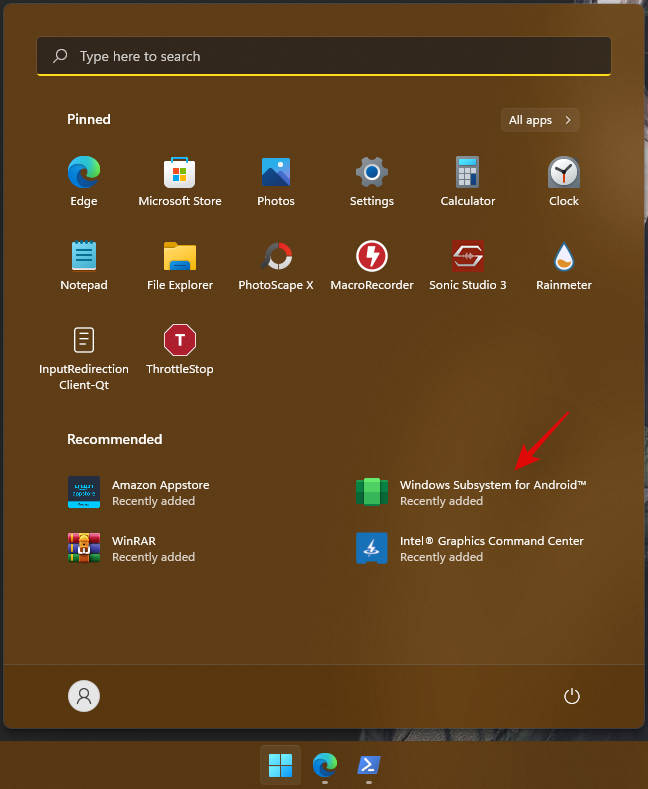
修改后的 WSA 现在将安装在您的系统上。按 Windows 键并从“开始”菜单启动相同的键。
windows-11-install-gapps-wsa-batch-1-9-1

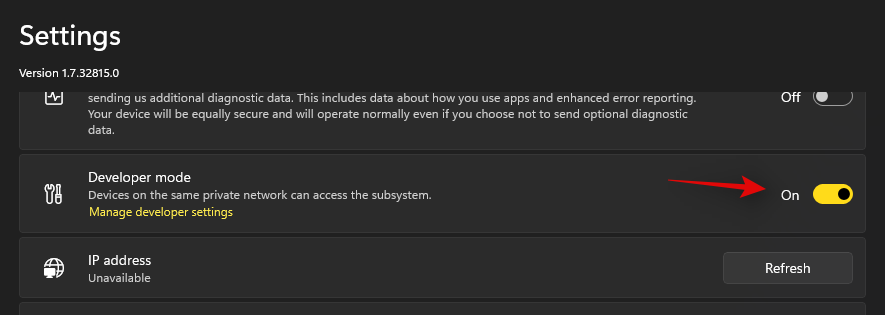
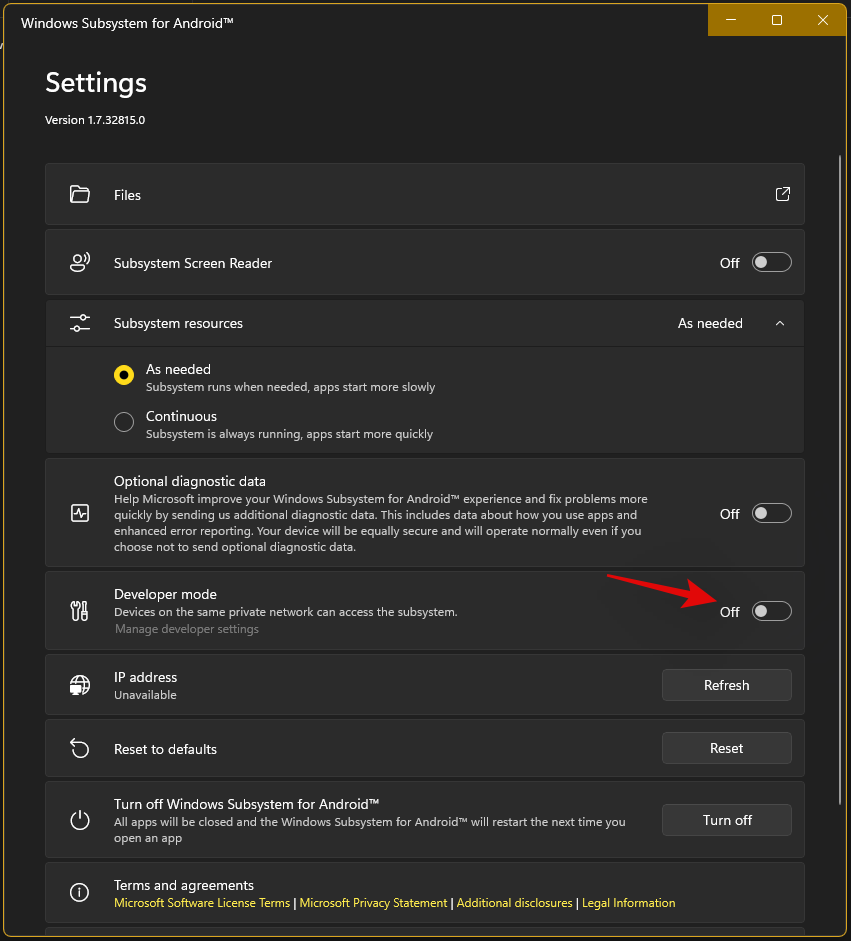
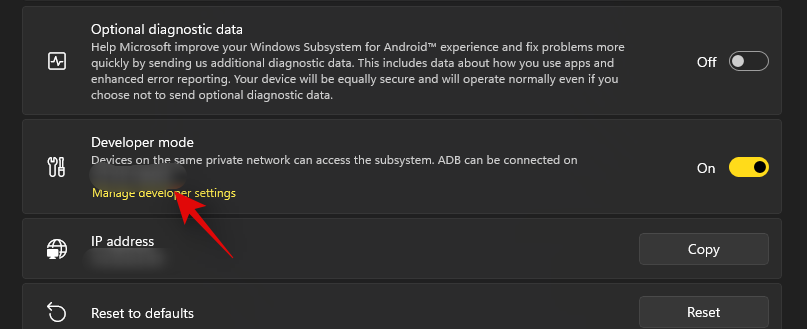
子系统启动后,单击并启用“开发人员模式”。 

windows-11-install-gapps-wsa-batch-1-24-1

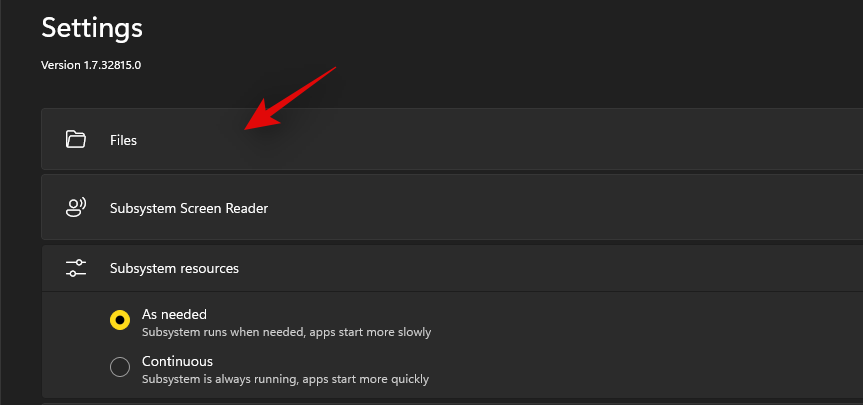
现在单击顶部的“文件”,以便在您的系统上启动适用于 Android 的 Windows 子系统。 
windows-11-install-gapps-wsa-batch-1-10-1

关闭文件应用程序。我们现在需要使用一种解决方法来登录 Play 商店。

windows-11-install-gapps-wsa-batch-1-11-1

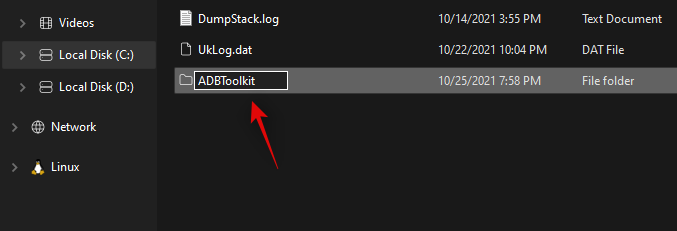
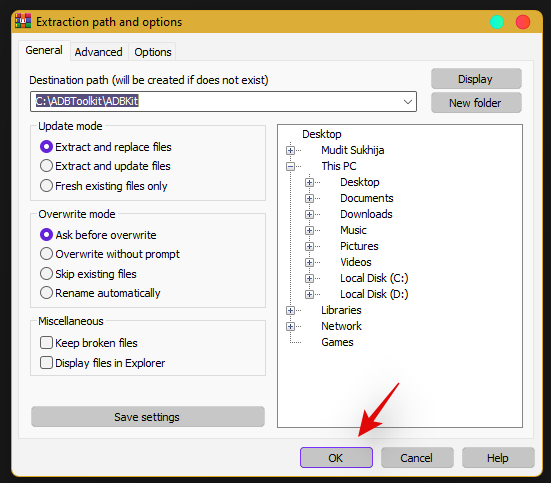
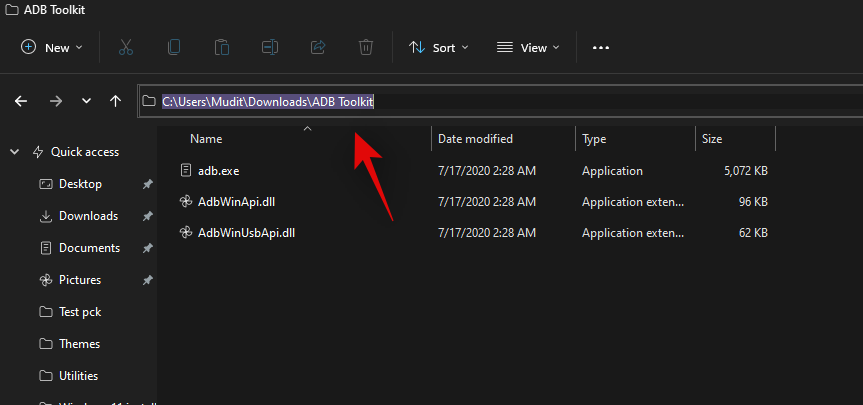
下载上面链接的 ADBToolkit 并将其解压缩到桌面上名为“ADBToolkit”的新文件夹中。提取后,单击顶部的地址栏并将地址复制到剪贴板。 
windows-11-install-gapps-wsa-batch-1-12-1

按下Windows + S键盘并搜索 Powershell。一旦 Powershell 出现在您的搜索结果中,单击“以管理员身份运行”。 

windows-11-install-gapps-wsa-batch-1-5-1

输入以下命令并将 PATH 替换为我们之前复制的 ADBToolkit 的路径。 

cd PATH

windows-11-install-gapps-wsa-batch-1-13-1

注意:确保从粘贴到 ADBToolkit 的路径中删除引号。 

现在切换回子系统窗口并复制“开发人员模式”下方给出的地址。

windows-11-install-gapps-wsa-batch-1-14

执行下面给出的命令来启动和连接 ADB。将“地址”替换为复制到剪贴板的地址(从上面)。 

.\adb.exe connect ADDRESS 

windows-11-install-gapps-wsa-batch-1-15-1

键入以下命令以启动 ADB shell。

.\adb.exe shell

windows-11-install-gapps-wsa-batch-1-16-1

现在使用以下命令获得 root 访问权限。 

su

windows-11-install-gapps-wsa-batch-1-17-1

现在输入以下命令。 

setenforce 0

windows-11-install-gapps-wsa-batch-1-18-1

输入“退出”以退出 PowerShell。 

windows-11-install-gapps-wsa-batch-1-19-1

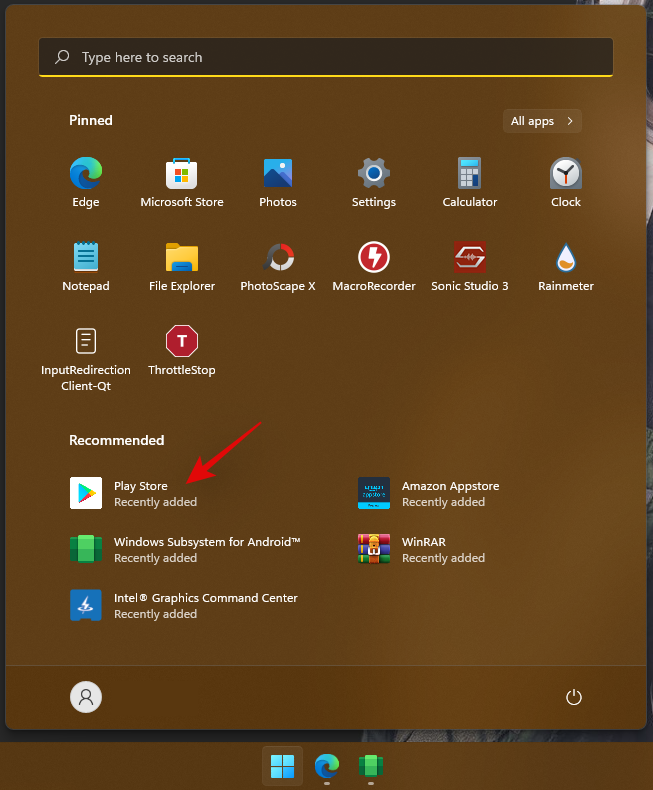
您现在可以关闭桌面上打开的所有窗口。现在按Windows + S并搜索“Play 商店”。一旦应用程序出现在您的搜索结果中,单击并启动该应用程序。 
windows-11-install-gapps-wsa-batch-1-21-1

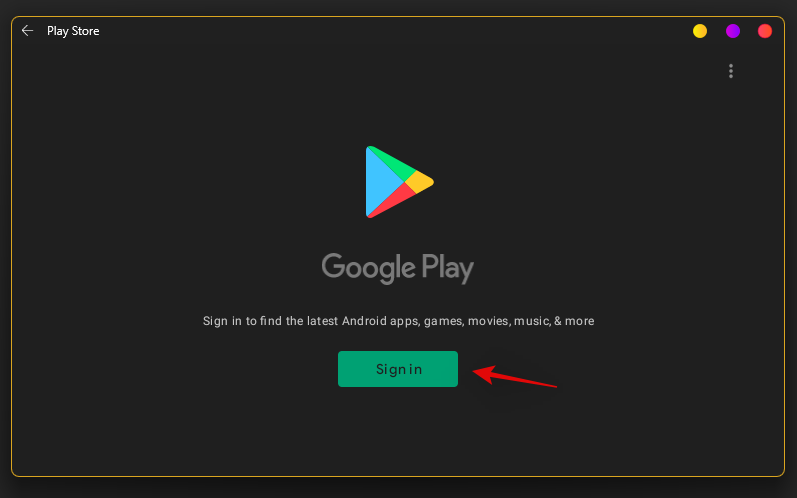
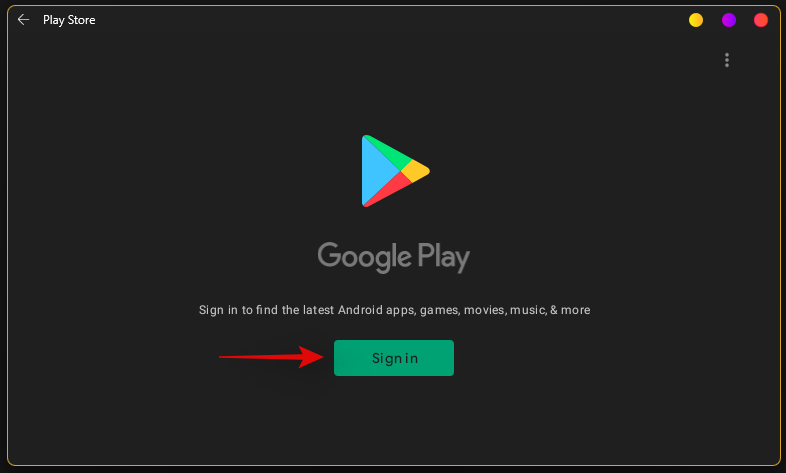
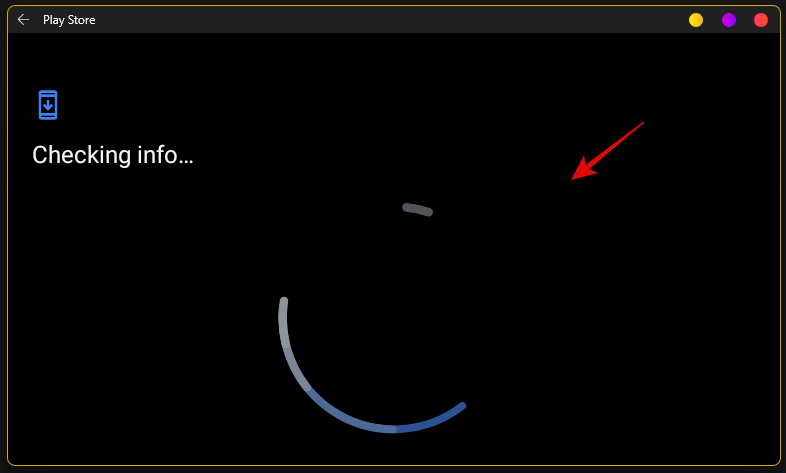
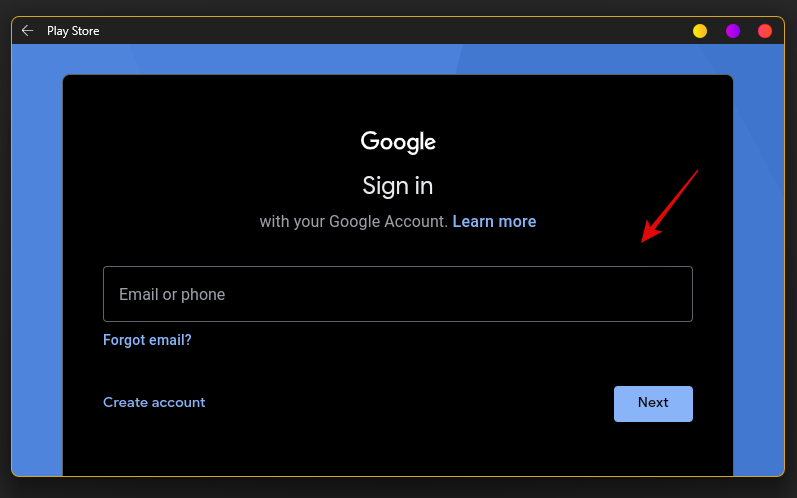
现在点击“登录”并使用您的 Google 帐户登录。 

windows-11-install-gapps-wsa-batch-1-22-1

您现在将使用您的 Google 帐户登录,您现在应该可以在 Windows 11 PC 上使用 Google Play 商店。 
windows-11-install-gapps-wsa-batch-1-23-1

就是这样!您现在可以直接从 Google Play 商店下载并在您的系统上安装所需的 Android 应用程序。 

方法#2:安装WSA,然后自己安装Gapps

上面的方法更容易,因此即使不完全值得推荐,也很容易使用,因为它是一个预先修改的(自定义)WSA 包。但是,如果您想要来自 Microsoft 的官方 WSA 包并希望自己安装 Gapps,那么这就是适合您的方法。顺便说一句,这是相当复杂的,所以可能经常想知道,简单地安装一个预装 Gapps 的自定义 WSA 包是否值得,我们会说,是。

建议您通过自己安装 Gapps 包在官方 WSA上的 PC 上获取 Google Apps 和 Play 商店,因为您不需要预先修改的 WSA,如果您担心方法 1 下自定义 WSA 包的安全性,这会有所帮助。 

你需要什么

  • WSGA 脚本下载链接(适用于 Android 的 Windows 子系统的 Gapps 脚本)
  • 适用于 Android 的 Windows 子系统关联
  • 商店 Adguard | 关联
  • OpenGApps | 关联
  • 亚行工具包下载链接
  • WinRAR | 下载链接
  • WSL:适用于 Linux 的 Windows 子系统
  • Ubuntu:下载链接
  • 重要提示:如果您在继续本指南之前已将其安装在您的 PC 上,请卸载适用于 Android 的原始 Windows 子系统。

分步指南

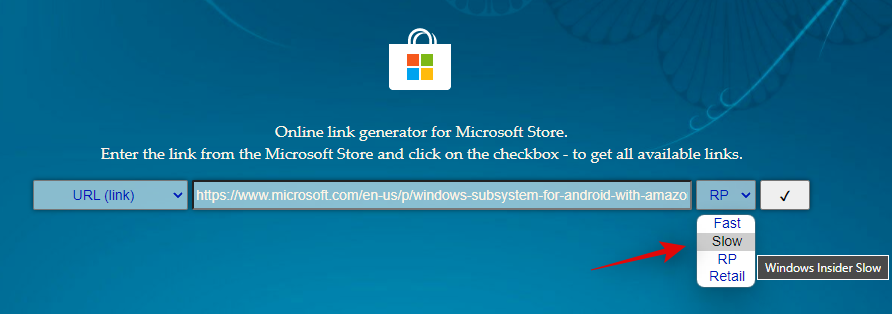
访问上面的 WSA 链接,然后将下面或上面给出的以下链接复制并粘贴到文本框中。

windows-11-install-gapps-and-play-store-batch-2-new-new-1-1

现在单击文本框旁边的下拉菜单,然后单击“慢”。 

windows-11-install-gapps-and-play-store-batch-2-new-new-2-1

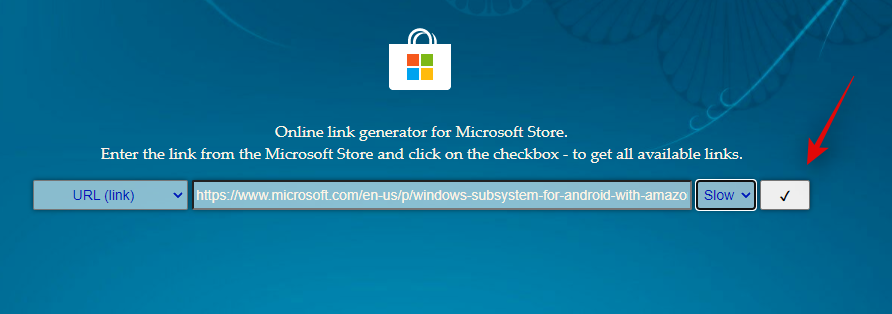
单击“复选标记”以处理给定的链接。

windows-11-install-gapps-and-play-store-batch-2-new-new-3-1

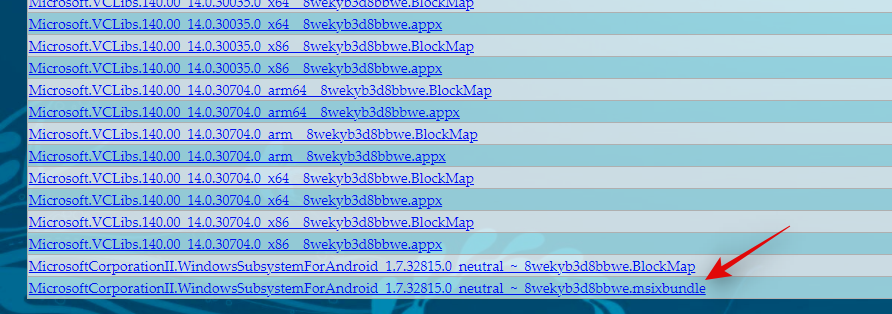
处理完成后,所有链接的下载文件现在都将显示在您的屏幕上。滚动到底部并单击底部的 .msix 包并将其下载到本地存储中的一个方便位置。 
windows-11-install-gapps-and-play-store-batch-2-new-new-4-1

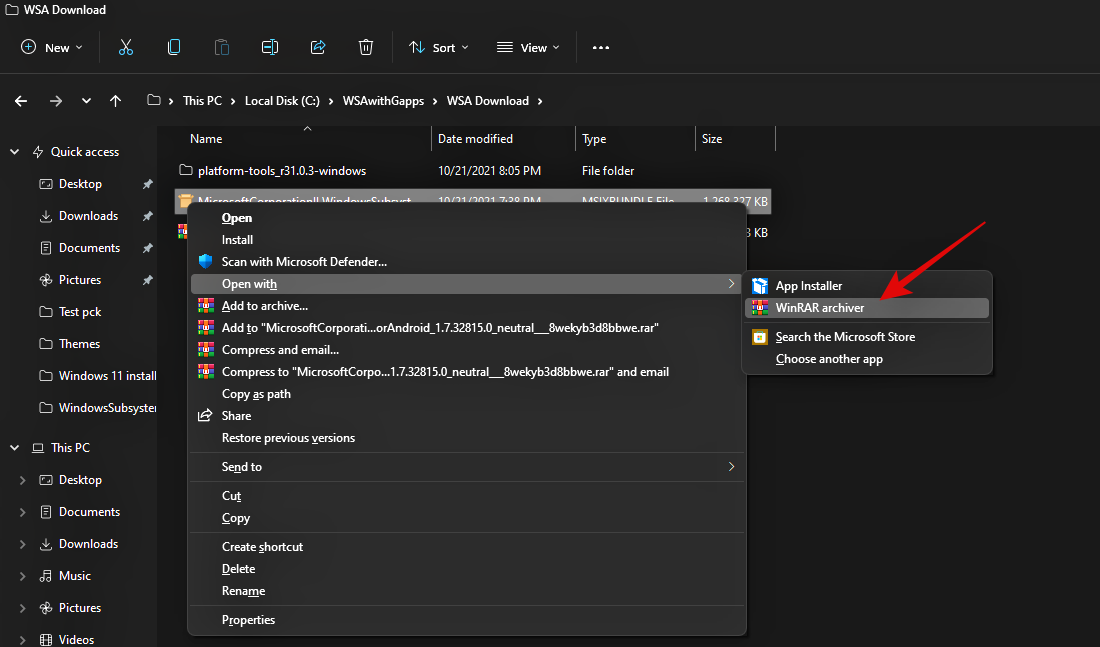
现在转到下载的文件,右键单击它并使用 WinRAR 打开它。如果您的 PC 上没有 WinRAR,请使用上面的链接下载并安装它。 
windows-11-install-gapps-and-play-store-batch-2-new-new-6-1

在 WinRAR 中打开包后,滚动到底部并检查 .msix 包的架构。它应该与您的 CPU 架构相匹配,如果不匹配,您可以从列表中选择所需的版本并继续阅读指南。 

windows-11-install-gapps-and-play-store-batch-2-new-new-7-1

双击并在 WinRAR 中打开相同的包。完成后,转到 C/boot 驱动器并创建一个名为“WindowsSubsystemForAndroid”的新文件夹。 

windows-11-install-gapps-and-play-store-batch-2-new-new-8-1

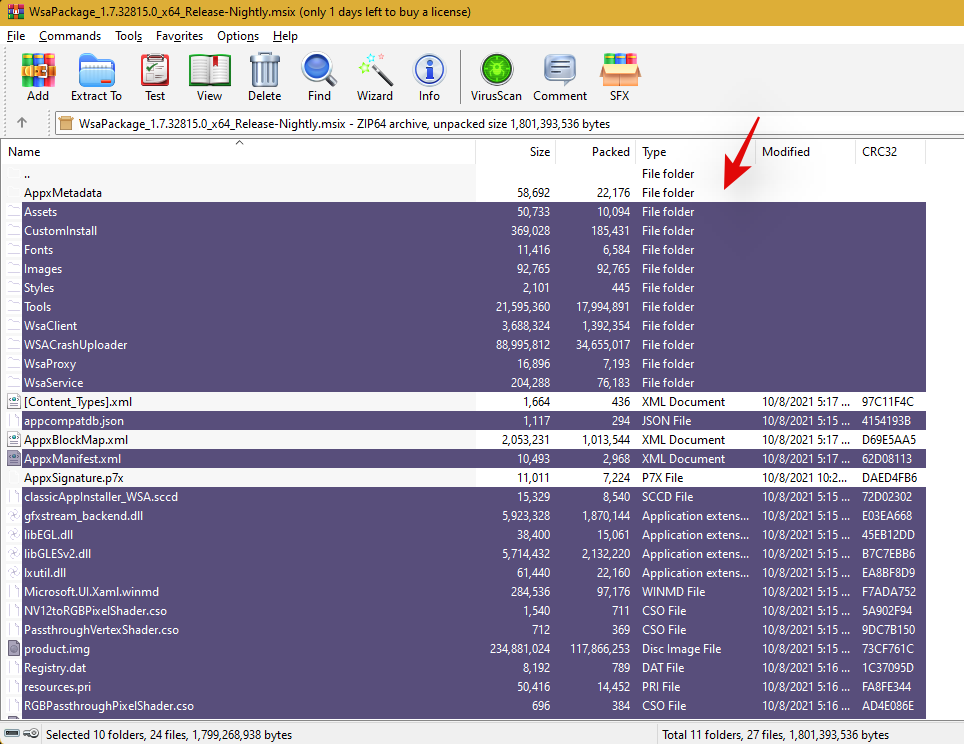
切换回 Winrar 并选择除以下文件夹和文件之外的所有文件。 

  • AppxMetadata(文件夹)
  • AppxBlockMap.xml(文件)
  • AppxSignature.p7x(文件)
  • [内容类型].xml(文件)

windows-11-install-gapps-and-play-store-batch-2-new-new-9-1

将所有选定的文件复制到我们之前创建的新“WindowsSubsystemForAndroid”文件夹中。 
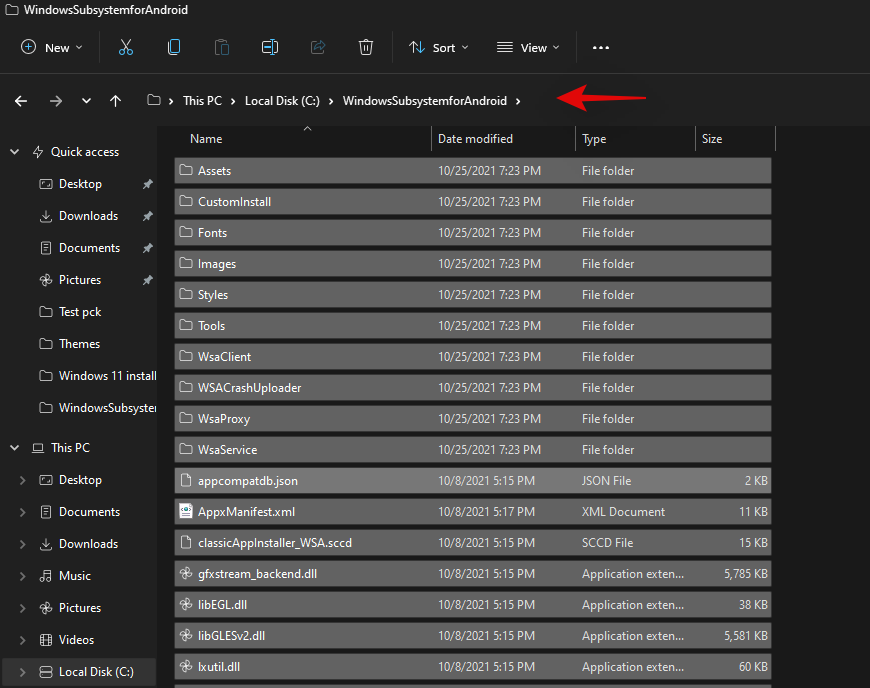
windows-11-install-gapps-and-play-store-batch-2-new-new-11-1

复制后,在启动驱动器上创建另一个名为“GAppsForWSA”的新文件夹。
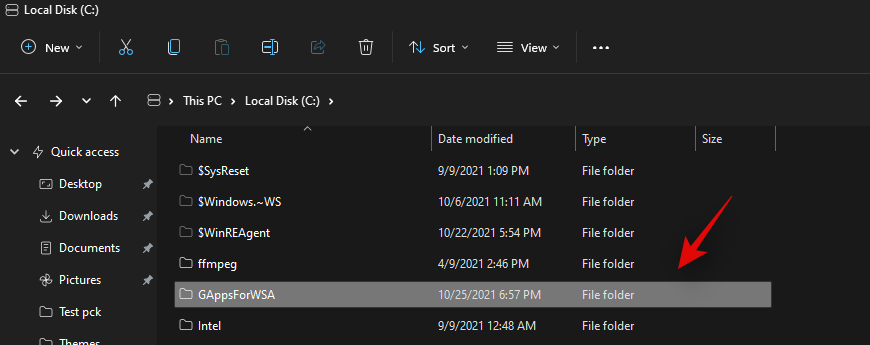
windows-11-install-gapps-and-play-store-batch-2-new-new-12-1

打开顶部的 WSGA 脚本链接,然后将其作为 .zip 文件下载到本地存储。 
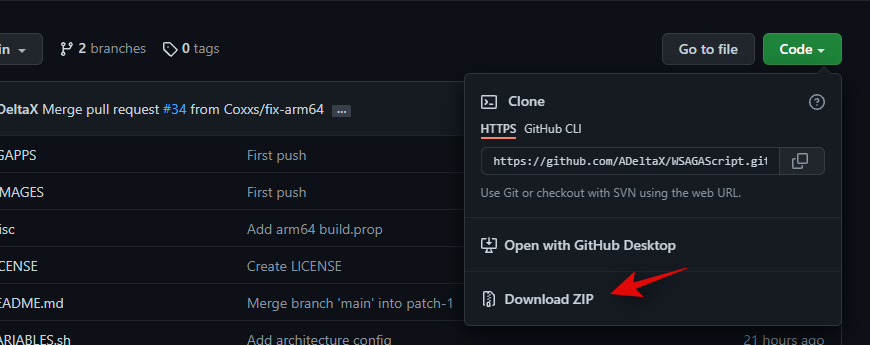
windows-11-install-gapps-and-play-store-batch-2-new-new-13-1

将 .zip 解压缩到我们在启动驱动器中创建的新“GAppsForWSA”文件夹。
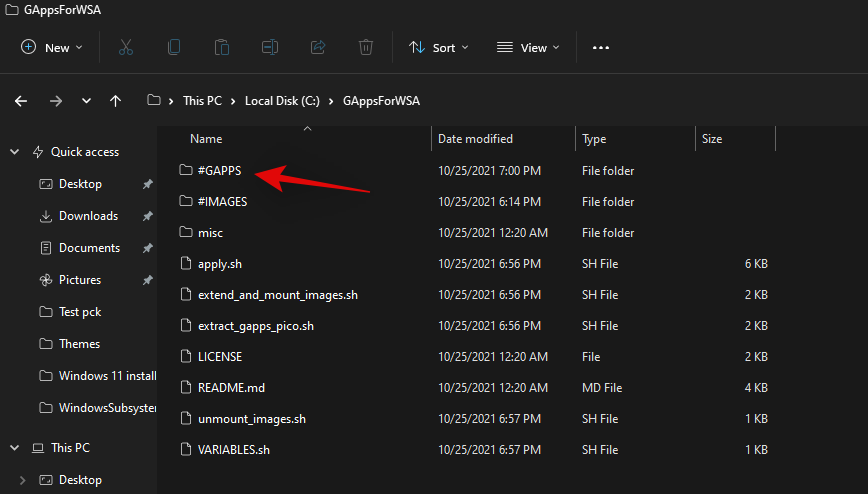
windows-11-install-gapps-and-play-store-batch-2-new-new-14-1

注意:提取存档中“WSGAScript-main”文件夹内容的内容。

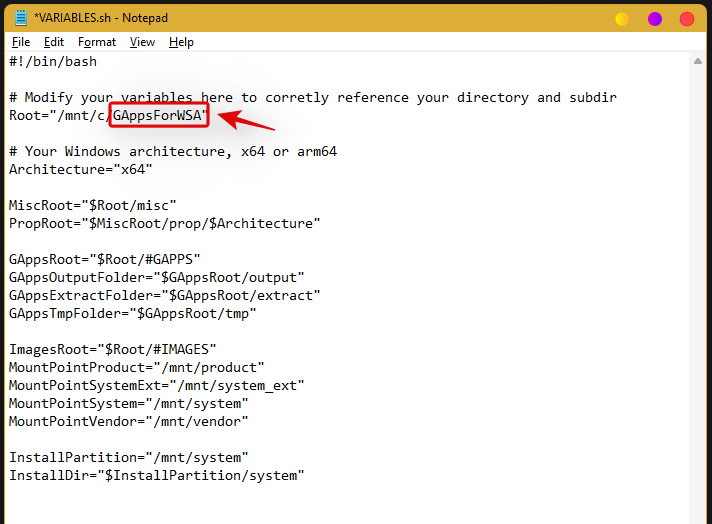
存档内容后,右键单击“VARIABLEs.sh”并使用记事本打开它。 

windows-11-install-gapps-and-play-store-batch-2-new-new-43-1

将“GAppsWSA”替换为“GAppsForWSA”。

windows-11-install-gapps-and-play-store-batch-2-new-new-44-1

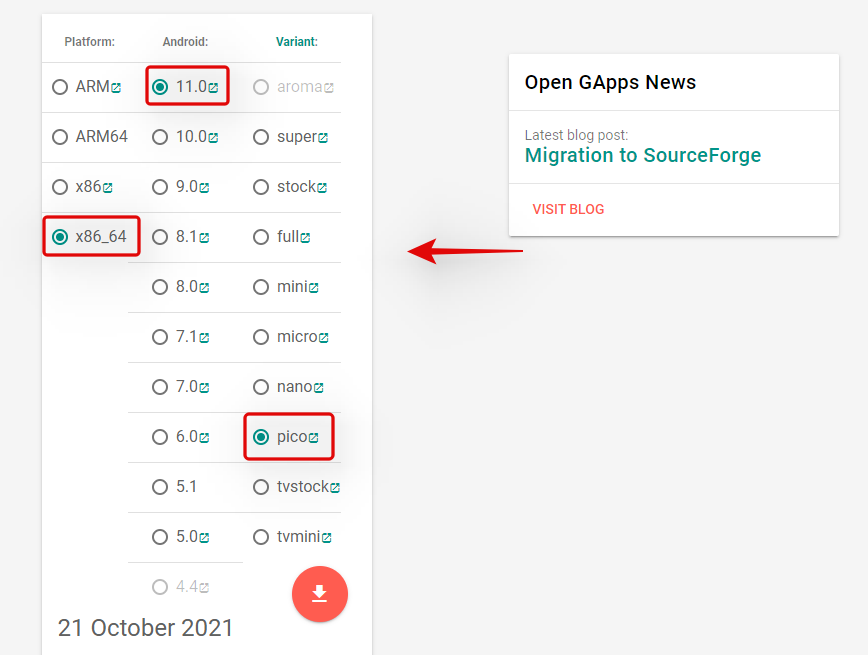
Ctrl + S键盘上的以保存更改。我们现在将为您的 WSA 安装下载 GApps。访问顶部的 OpenGApps 链接并选择下面给出的以下选项。 

  • 平台: x86_64
  • 安卓: 11.0
  • 变体:微微

windows-11-install-gapps-and-play-store-batch-2-new-new-15-1

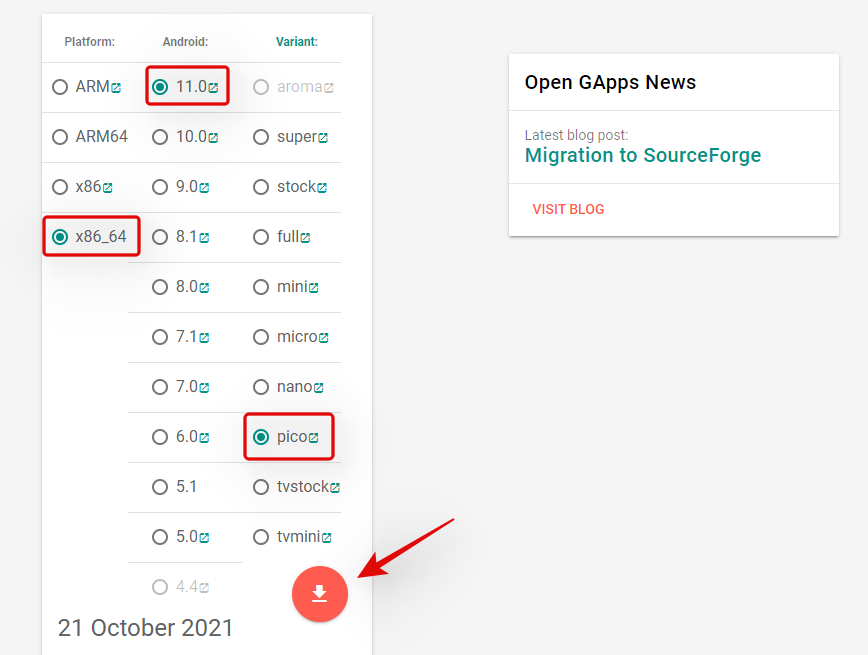
单击“下载图标”。 

windows-11-install-gapps-and-play-store-batch-2-new-new-16-1

您现在将被重定向到 Sourceforge,等待几秒钟,下载将自动为您启动。

windows-11-install-gapps-and-play-store-batch-2-new-new-17-1

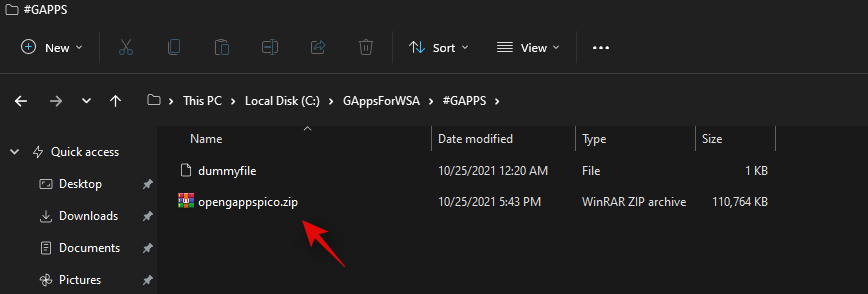
下载存档并将其存储在引导驱动器上“GAppsForWSA”文件夹中的以下位置。

Boot Drive\GAppsForWSA\#GAPPS
windows-11-install-gapps-and-play-store-batch-2-new-new-18-1

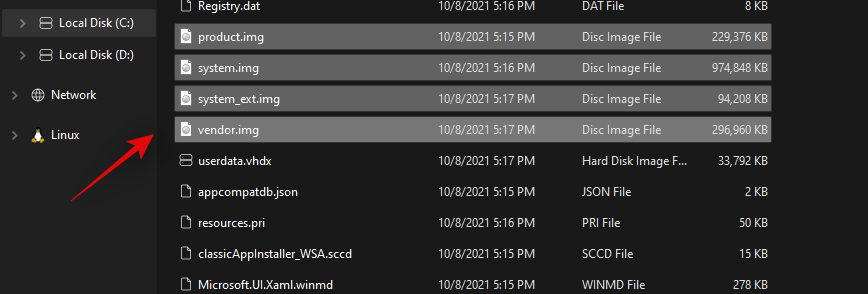
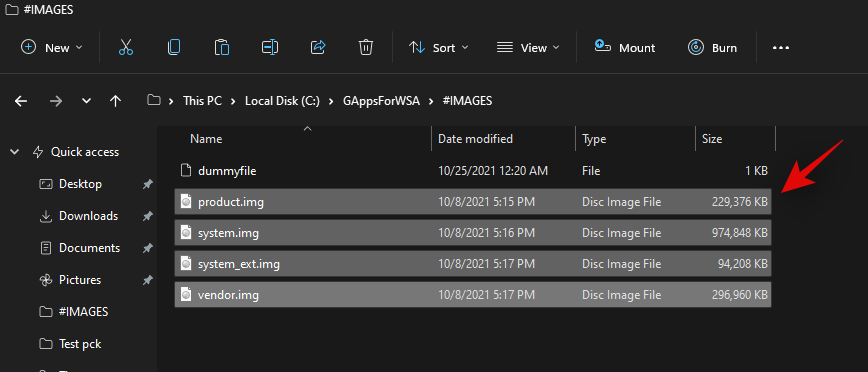
现在返回到您的启动驱动器并打开“WindowsSubsystemForAndroid”。复制以下4个文件。 

  • 供应商.img
  • system_ext.img
  • 系统文件
  • 产品图片

windows-11-install-gapps-and-play-store-batch-2-new-new-19-1

导航到以下位置并粘贴所有复制的文件。 

Boot Drive\GAppsForWSA\#IMAGES
windows-11-install-gapps-and-play-store-batch-2-new-new-20-1

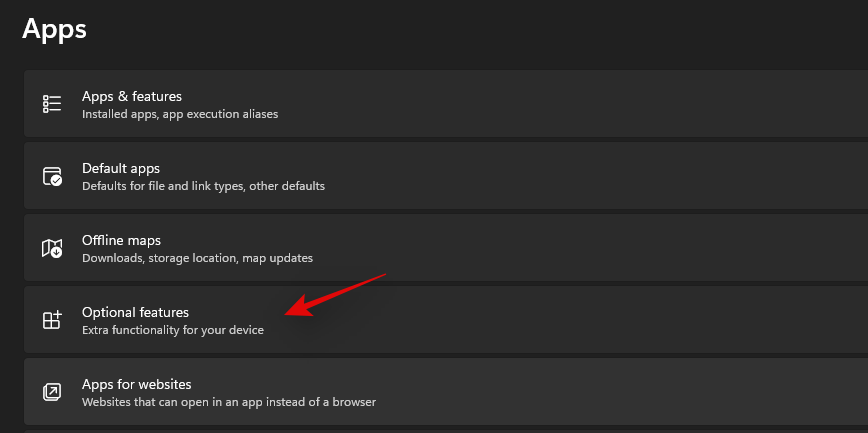
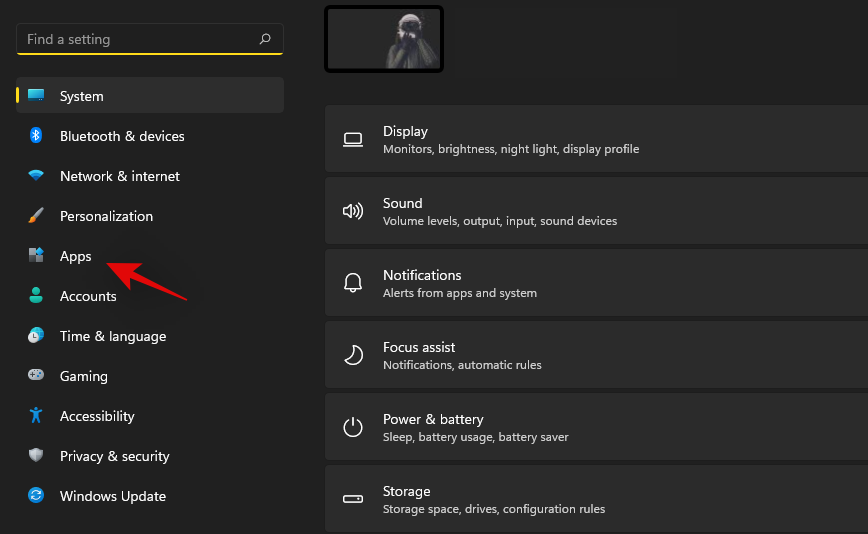
我们现在将为您的系统安装 WSL。WSL 是一个 Linux 子系统,它允许您使用为 Linux 开发的可执行文件和脚本。按下Windows + i键盘打开设置应用程序,然后单击左侧的“应用程序”。 
windows-11-install-gapps-and-play-store-batch-2-new-new-21-1

现在单击“可选功能”。 

windows-11-install-gapps-and-play-store-batch-2-new-new-22-1

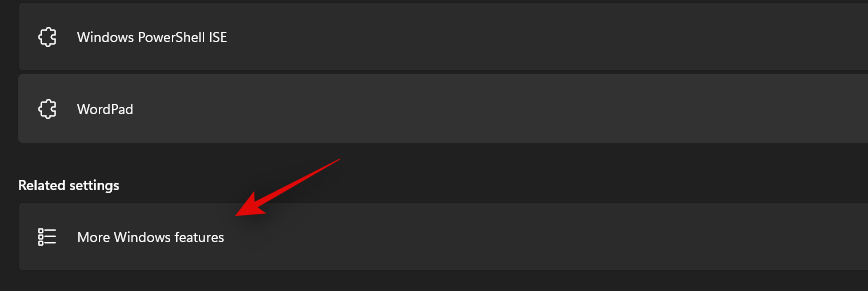
向下滚动并单击“更多 Windows 功能”。 

windows-11-install-gapps-and-play-store-batch-2-new-new-23-1

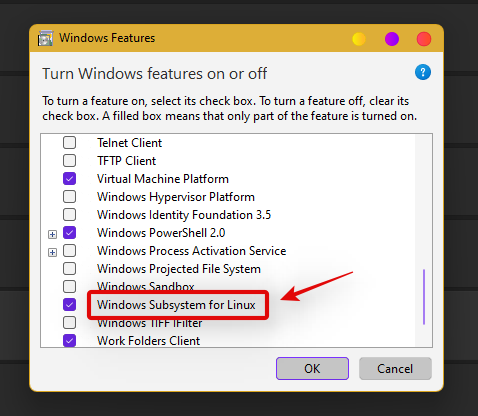
现在将在您的屏幕上打开一个可用功能的新窗口。滚动到底部并选中“适用于 Linux 的 Windows 子系统”框。 
windows-11-install-gapps-and-play-store-batch-2-new-new-24-1

完成后单击“确定”。Linux 子系统现在将安装在您的 PC 上。现在将提示您重新启动 PC。我们建议您此时重新启动您的 PC,即使您没有收到提示。

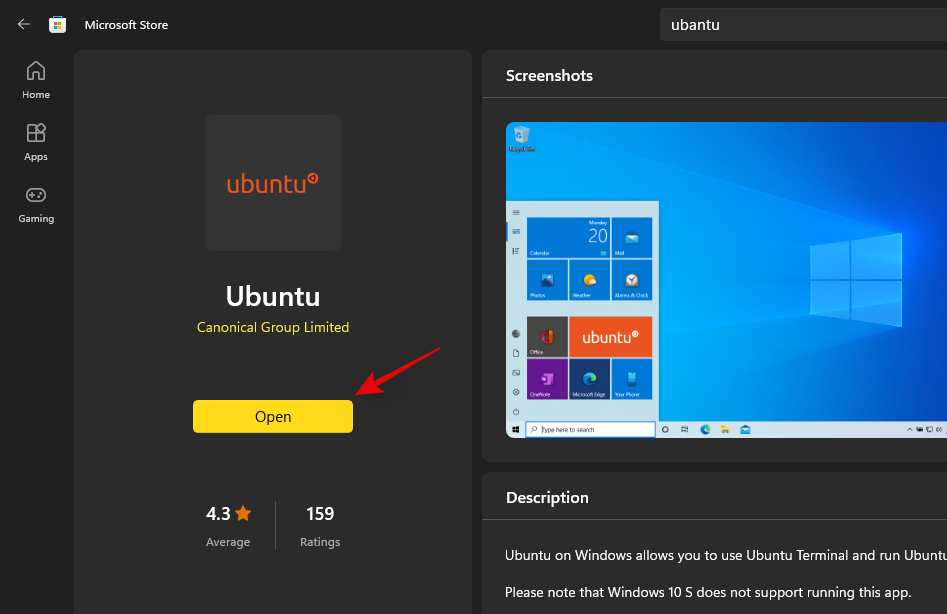
我们现在将安装一个发行版,它将在此设置过程中为我们提供帮助。我们建议您使用 Microsoft Store 上提供的 Ubuntu,因为它可以轻松下载并从您的系统中删除。使用下面的链接在 Microsoft Store 中访问和下载 Ubuntu。

安装应用程序后,单击“打开”以配置您的安装。您还可以根据自己的喜好从“开始”菜单启动该应用程序。 
windows-11-install-gapps-and-play-store-batch-2-new-new-25-1

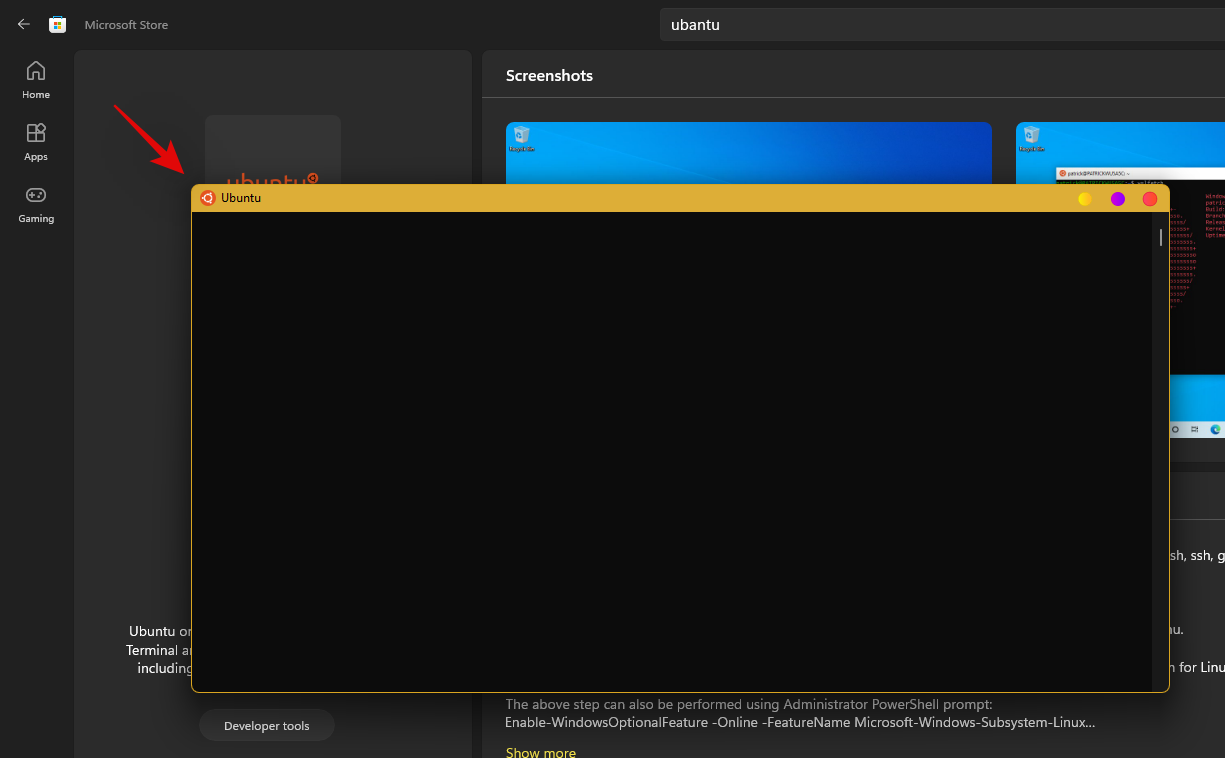
Ubuntu 现在将安装在您的系统上。安装后,继续设置用户名以保护您的安装。随后,输入密码以保护系统上的 root 访问权限。 
windows-11-install-gapps-and-play-store-batch-2-new-new-26-1

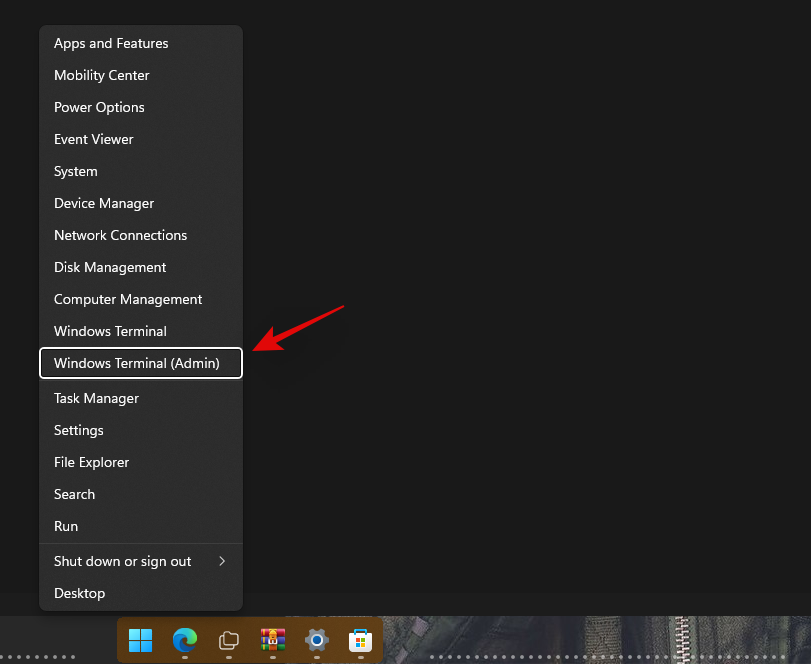
发行版现已在您的系统上设置,您可以关闭当前窗口并按Windows + X。选择“Windows 终端(管理员)”。 
windows-11-install-gapps-and-play-store-batch-2-new-new-27-1

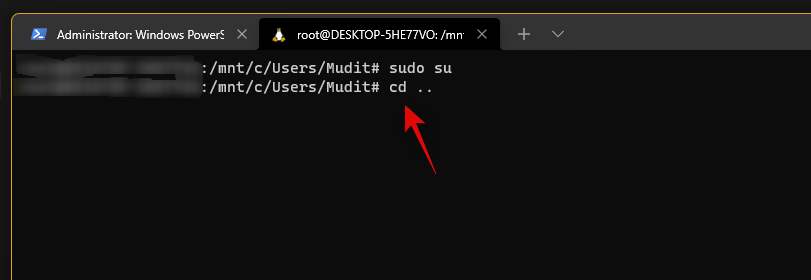
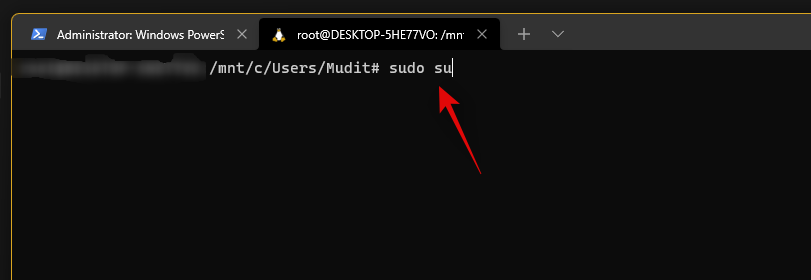
单击顶部的下拉箭头并选择相同的选项以在新选项卡中启动 WSL 终端。我们现在需要 root 访问权限才能使用 GApps 修改您的 WSA。输入以下命令,然后按键盘上的 Enter。如果您没有设置用户名或密码,那么您应该已经在终端中拥有 root 访问权限。您可以跳过此步骤并转到下一个步骤。 

sudo su
windows-11-install-gapps-and-play-store-batch-2-new-new-28-1

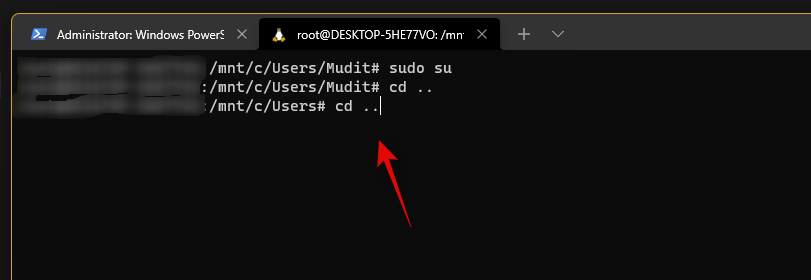
输入您的密码以授予 root 访问权限(如果适用)。现在一一输入以下命令。

  • cd ..

windows-11-install-gapps-and-play-store-batch-2-new-new-29-1

  • cd ..

windows-11-install-gapps-and-play-store-batch-2-new-new-30-1

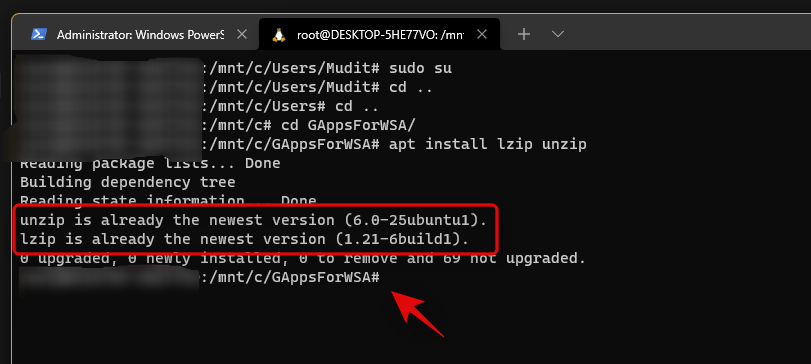
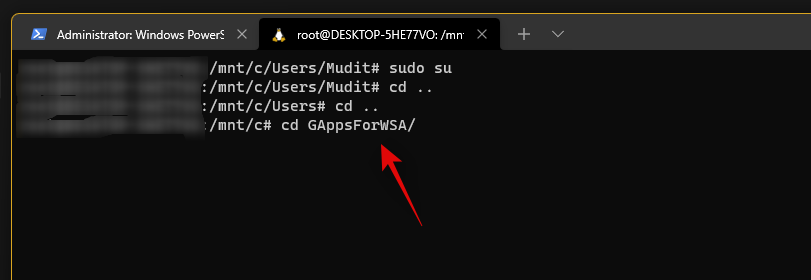
最后使用下面的命令导航到“GAppsForWSA”。

cd GAppsForWSA/
windows-11-install-gapps-and-play-store-batch-2-new-new-31-1

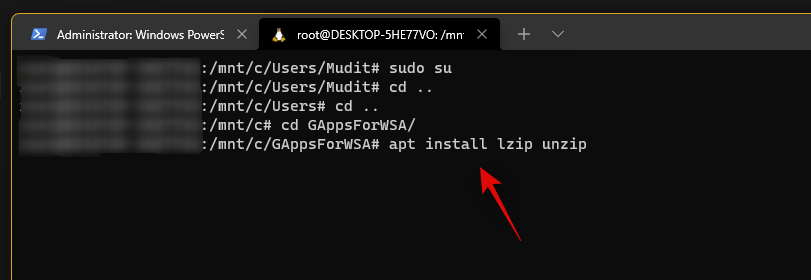
现在输入以下命令来安装此过程所需的“lzip”和“unzip”。 

apt install lzip unzip
windows-11-install-gapps-and-play-store-batch-2-new-new-32-1

注意:如果您无法获得 lzip 或 unzip 设置,请运行apt-get update -y 以更新您的存储库和包

输入“ Y”以确认您的选择。

windows-11-install-gapps-and-play-store-batch-2-new-new-33-1

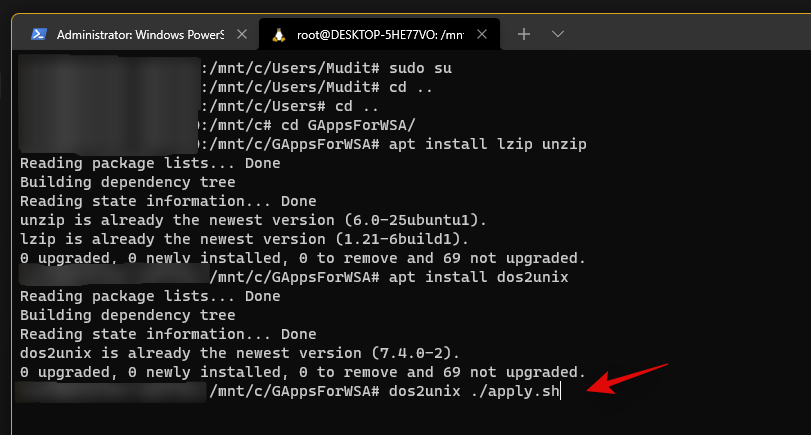
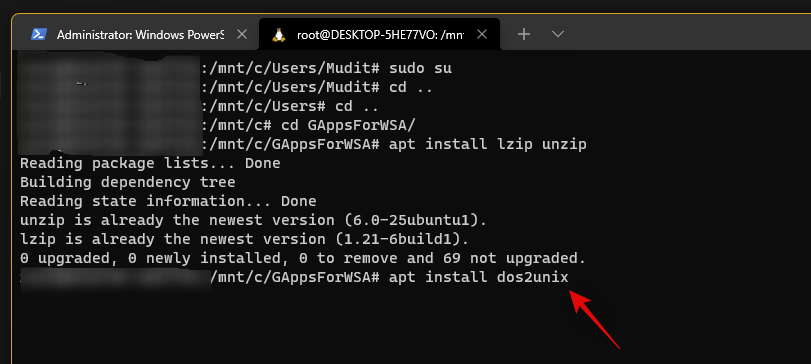
我们现在将安装“dos2unix”,此修改也需要它。使用以下命令在您的 PC 上安装相同的命令。 

apt install dos2unix
windows-11-install-gapps-and-play-store-batch-2-new-new-34-1

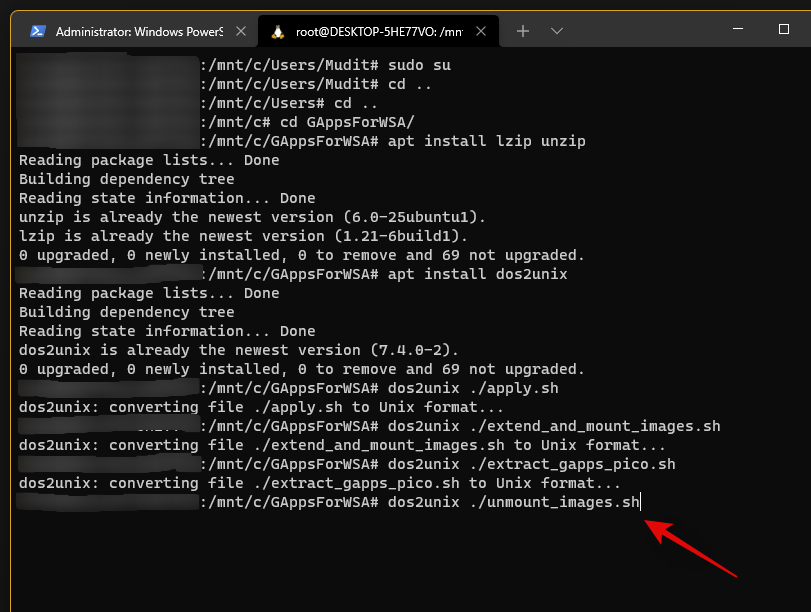
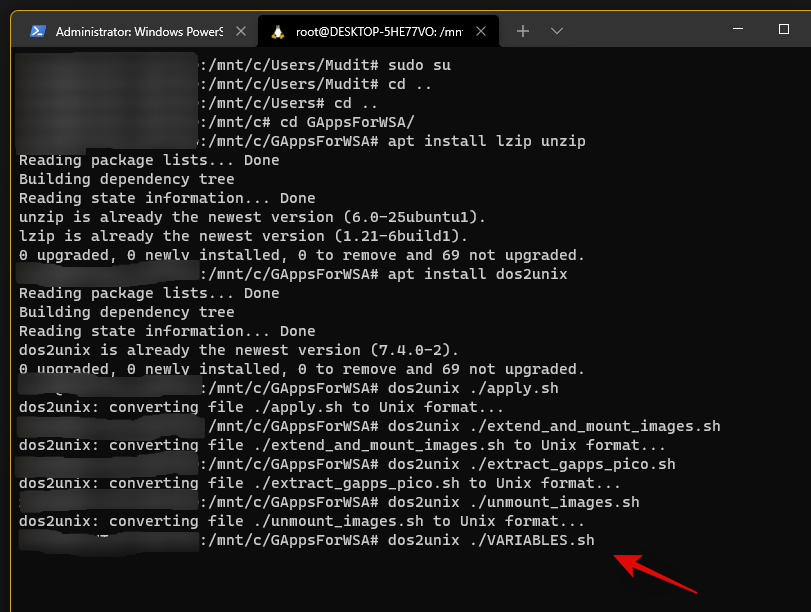
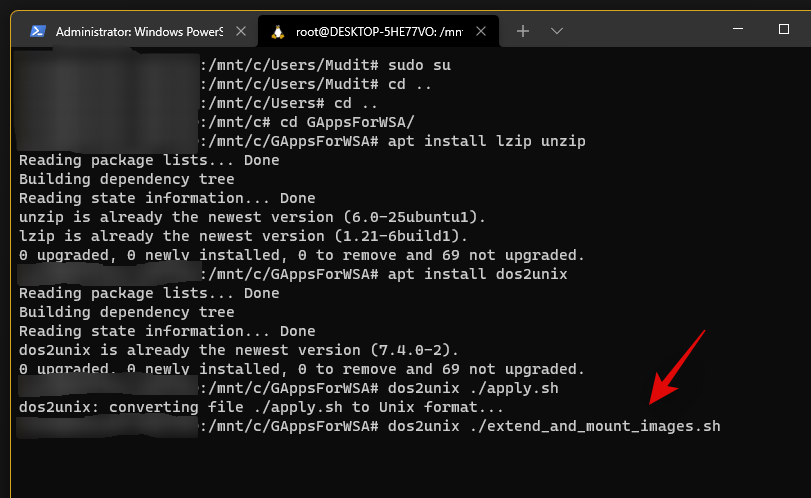
现在是时候修改您的 WSA 映像了。在终端中按照相同的顺序依次输入并执行以下命令。 

  • 命令 1: dos2unix ./apply.sh

windows-11-install-gapps-and-play-store-batch-2-new-new-36-1

  • 命令 2: dos2unix ./extend_and_mount_images.sh
windows-11-install-gapps-and-play-store-batch-2-new-new-37-1

  • 命令 3: dos2unix ./extract_gapps_pico.sh
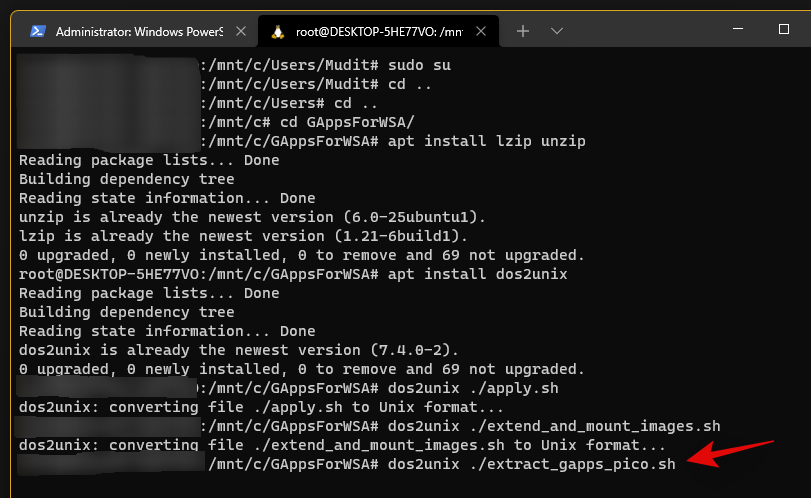
windows-11-install-gapps-and-play-store-batch-2-new-new-38-1

  • 命令 4: dos2unix ./unmount_images.sh

windows-11-install-gapps-and-play-store-batch-2-new-new-39-1

  • 命令 5: dos2unix ./VARIABLES.sh

windows-11-install-gapps-and-play-store-batch-2-new-new-40-1

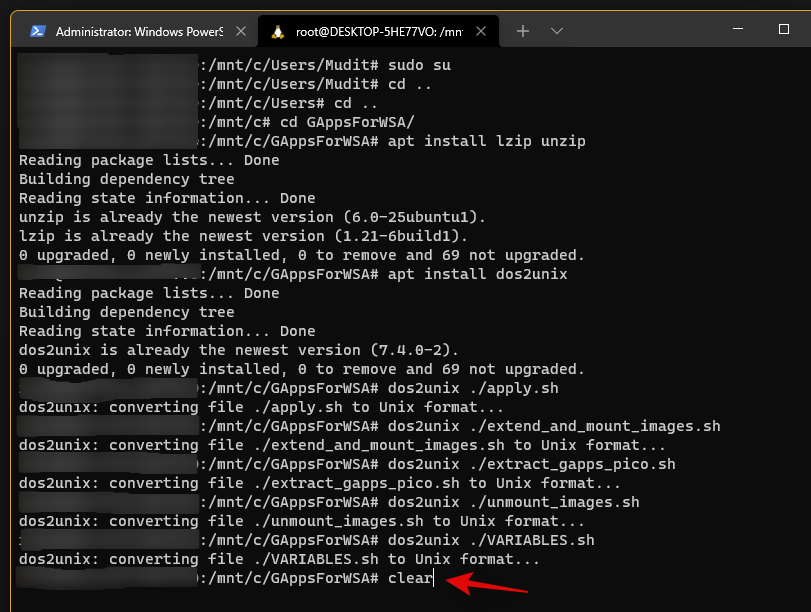
该过程完成后,键入以下内容以清理您的终端以便更好地管理。 

clear

windows-11-install-gapps-and-play-store-batch-2-new-new-41-1

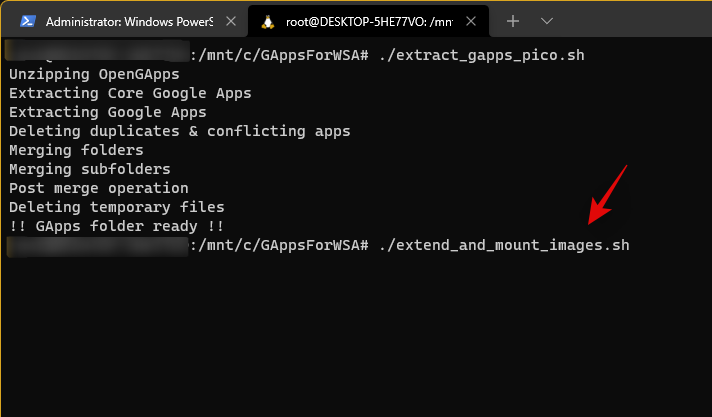
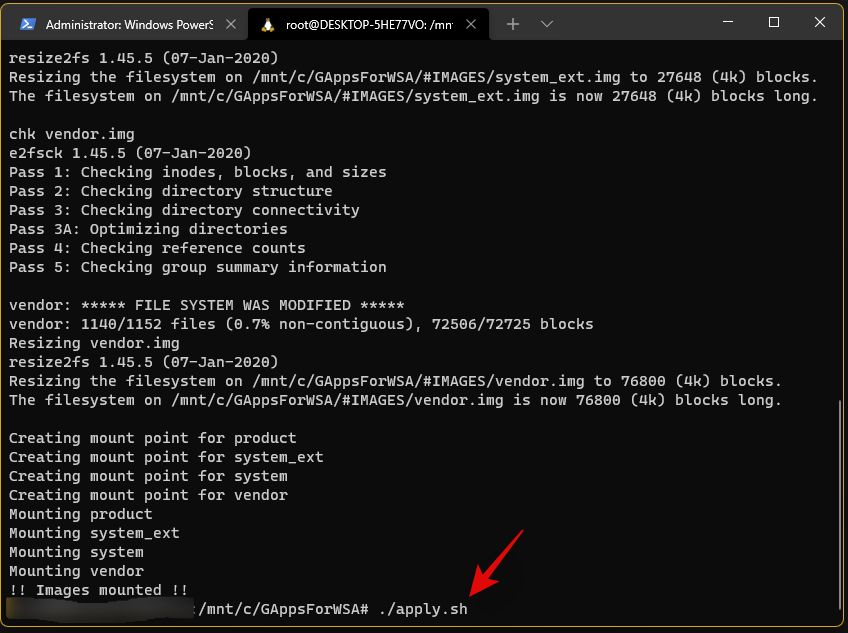
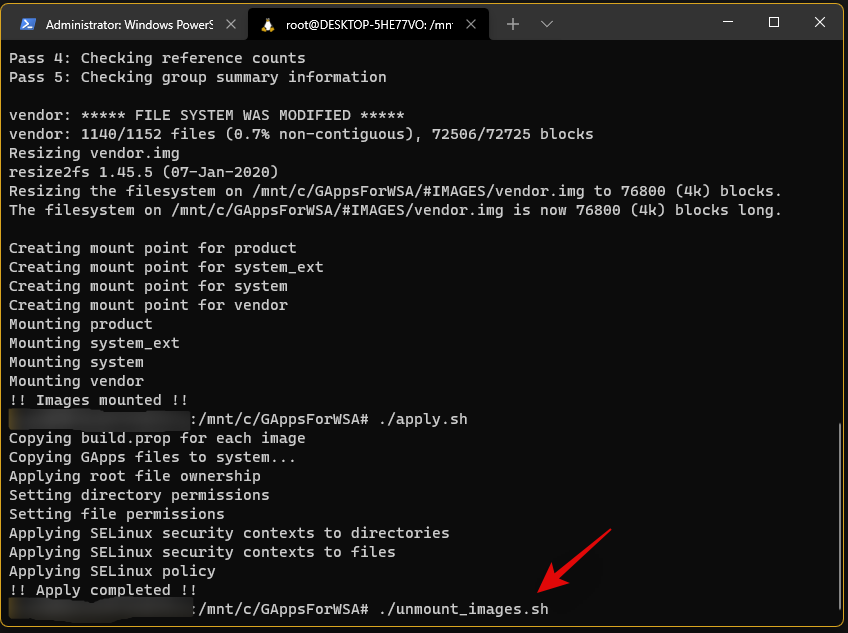
现在我们有了我们的脚本,让我们执行它们。按照相同的顺序一一输入并执行下面给出的命令。 

  • 命令 1: ./extract_gapps_pico.sh

windows-11-install-gapps-and-play-store-batch-2-new-new-42-1

  • 命令 2: ./extend_and_mount_images.sh

windows-11-install-gapps-and-play-store-batch-2-new-new-47-1

  • 命令 3: ./apply.sh

windows-11-install-gapps-and-play-store-batch-2-new-new-48-1

  • 命令 4: ./unmount_images.sh

windows-11-install-gapps-and-play-store-batch-2-new-new-50-1

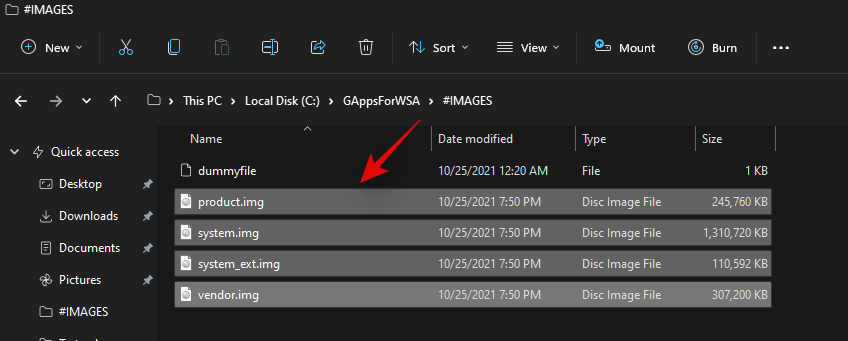
我们现在完成了控制台,现在,您可以关闭它。转到您的启动驱动器并导航到以下位置。 

\GAppsForWSA\#IMAGES
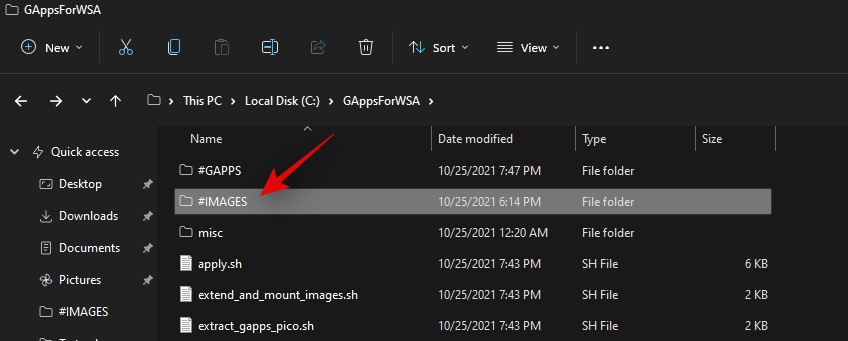
windows-11-install-gapps-and-play-store-batch-2-new-new-52-1

将以下文件复制到剪贴板。 

  • 产品图片
  • 系统文件
  • system_ext.img
  • 供应商.img

windows-11-install-gapps-and-play-store-batch-2-new-new-53-1

现在导航到启动驱动器上的“WindowsSubsystemForAndroid”文件夹并将所有复制的图像粘贴到同一位置。出现提示时选择替换文件。 
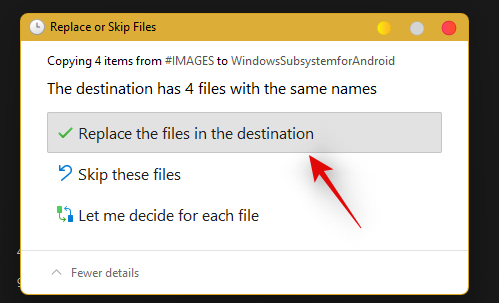
windows-11-install-gapps-and-play-store-batch-2-new-new-54-1

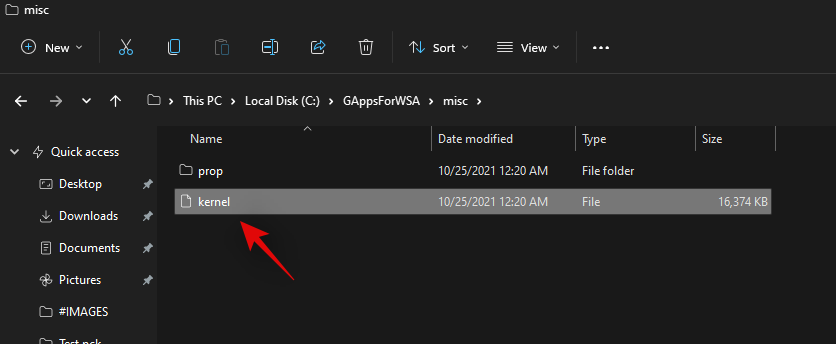
我们现在几乎完成了修改。导航到启动驱动器上的“GAppsForWSA”文件夹,双击并打开“misc”文件夹。 
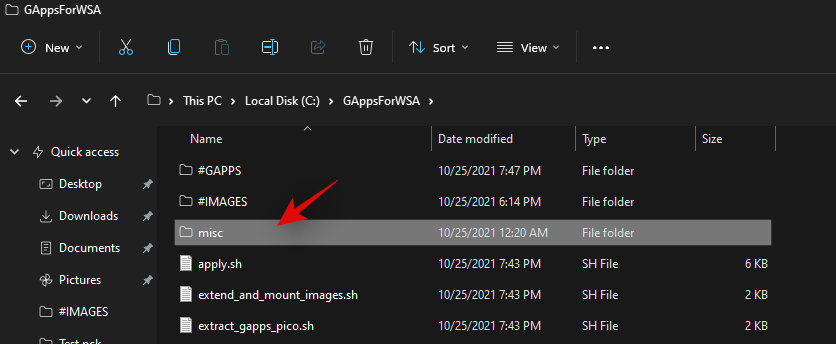
windows-11-install-gapps-and-play-store-batch-2-new-new-55-1

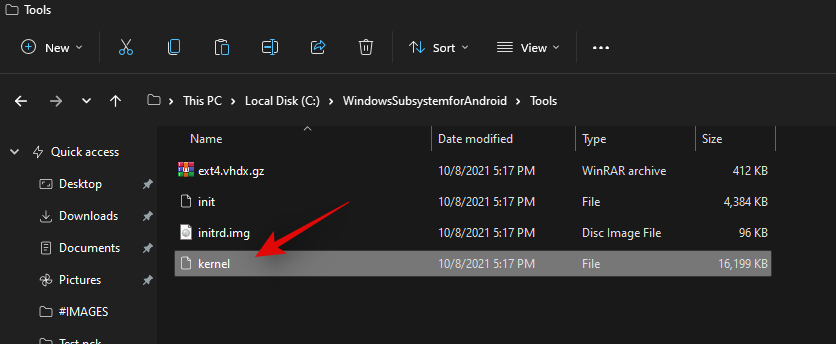
将“内核”复制到剪贴板。

windows-11-install-gapps-and-play-store-batch-2-new-new-56-1

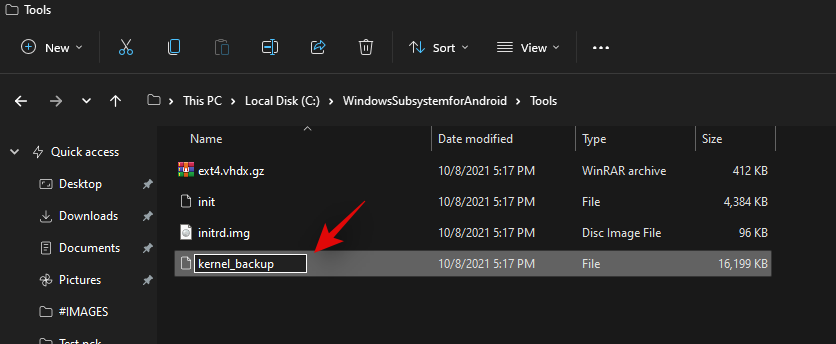
导航到以下位置。 

Boot drive\WindowsSubsystemForAndroid\Tools
windows-11-install-gapps-and-play-store-batch-2-new-new-57-1

将“内核”重命名为“内核备份”。 

windows-11-install-gapps-and-play-store-batch-2-new-new-58-1

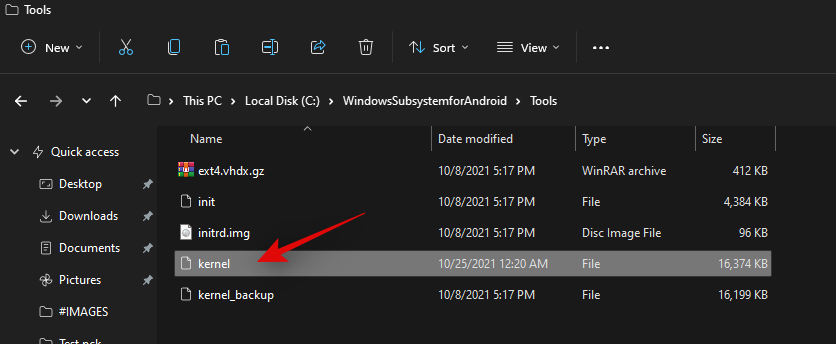
现在将我们之前复制到剪贴板的内核文件粘贴到同一位置。

windows-11-install-gapps-and-play-store-batch-2-new-new-59-1

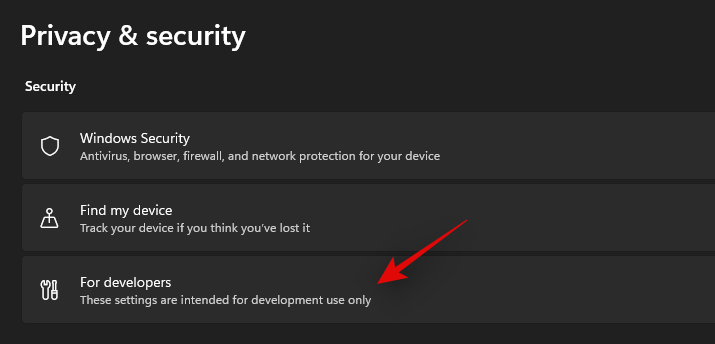
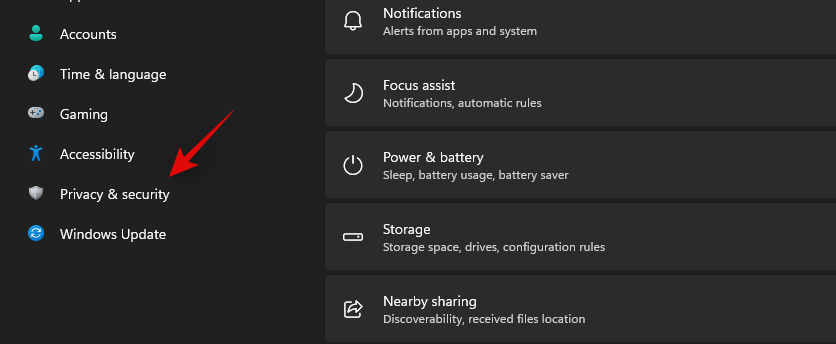
我们现在需要为您安装的 Windows 11 启用开发人员模式。按Windows + i打开设置应用程序,然后单击右侧的“隐私和安全”。 
windows-11-install-gapps-and-play-store-batch-2-new-new-60-1
单击“对于开发人员”。 

windows-11-install-gapps-and-play-store-batch-2-new-new-61-1

启用顶部的“开发人员模式”切换开关。 

windows-11-install-gapps-and-play-store-batch-2-new-new-62-1

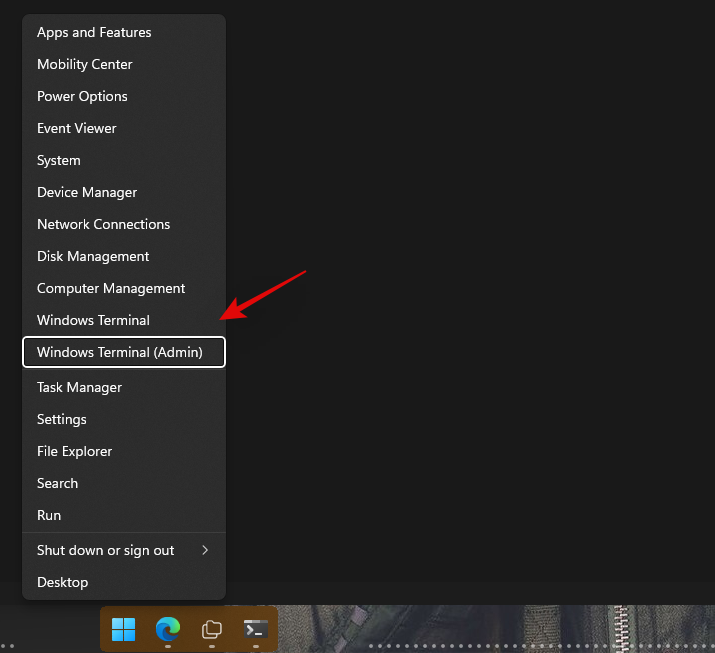
单击“是”以确认您的选择。现在按下Windows + X并选择“Windows 终端(管理员)”。 
windows-11-install-gapps-and-play-store-batch-2-new-new-63-1

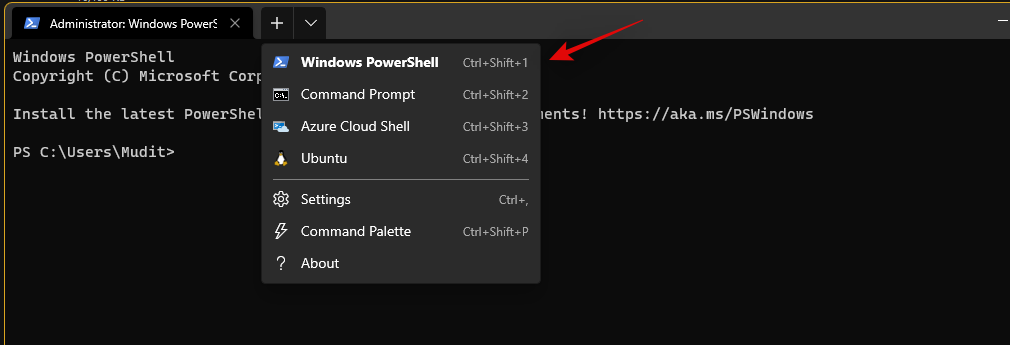
单击顶部的下拉箭头并选择“Windows Powershell”。 

windows-11-install-gapps-and-play-store-batch-2-new-new-64-1

注意:不要选择“Powershell”,确保选择“Windows Powershell”。

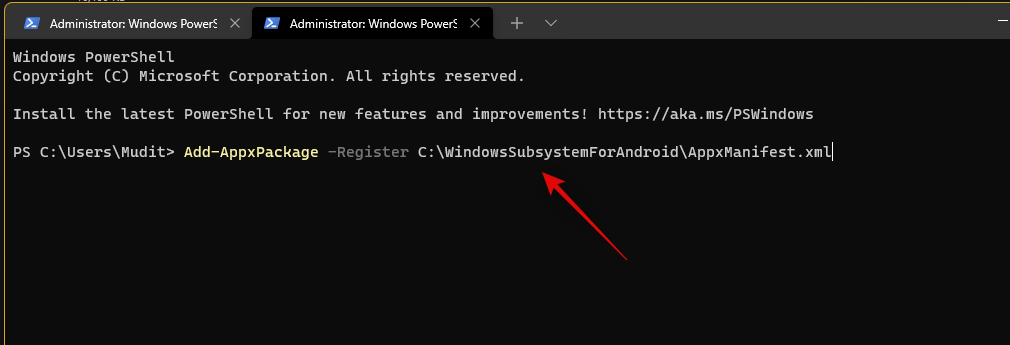
现在运行以下命令。

Add-AppxPackage -Register C:\WindowsSubsystemForAndroid\AppxManifest.xml
windows-11-install-gapps-and-play-store-batch-2-new-new-65-1

修改后的子系统现在将安装在您的 PC 上。

windows-11-install-gapps-and-play-store-batch-2-new-new-66-1

过程完成后,按 Windows 键并启动相同的键。

windows-11-install-gapps-and-play-store-batch-2-new-new-67-1

在 Android 子系统中启用“开发者模式”切换。 

windows-11-install-gapps-and-play-store-batch-2-new-new-68-1

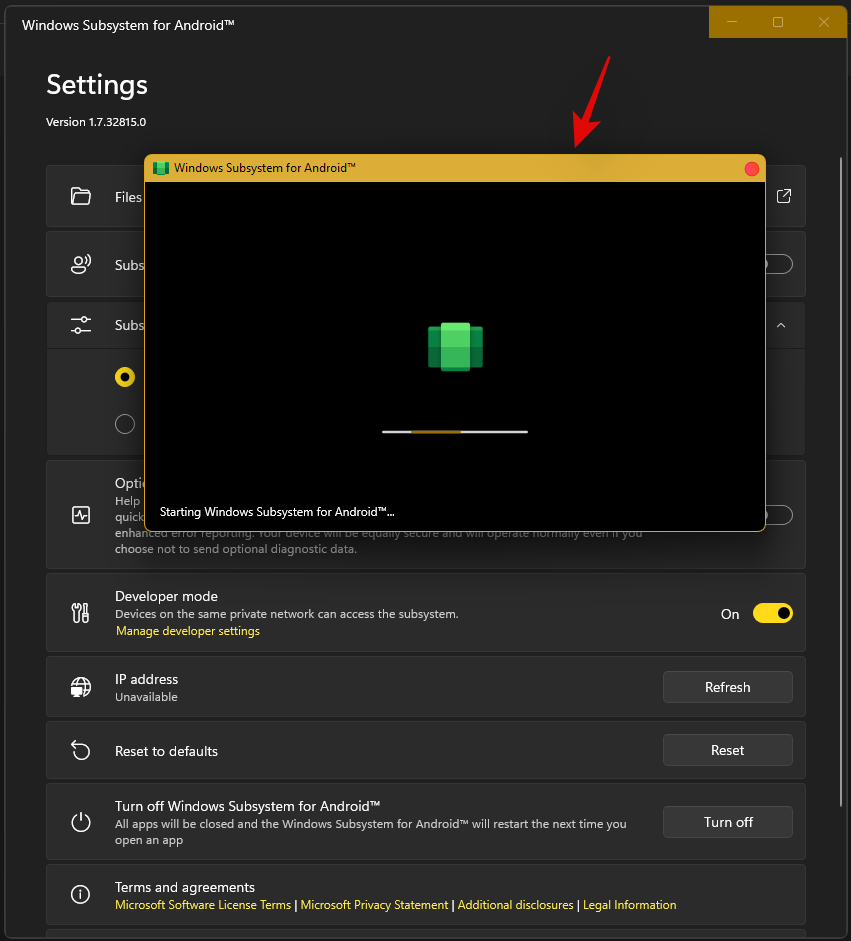
单击顶部的“文件”以在您的 PC 上启动子系统。您现在可能需要等待几分钟,具体取决于您的 PC。 
windows-11-install-gapps-and-play-store-batch-2-new-new-70-1

打开文件应用程序后关闭它并下载上面链接的 ADBToolkit。

windows-11-install-gapps-and-play-store-batch-2-new-new-71-1

现在在启动驱动器上创建一个新文件夹并将其命名为“ADBToolkit”。

windows-11-install-gapps-and-play-store-batch-2-new-new-72-1

将存档解压缩到同一位置,然后删除存档和原始文件夹。

windows-11-install-gapps-and-play-store-batch-2-new-new-73-1

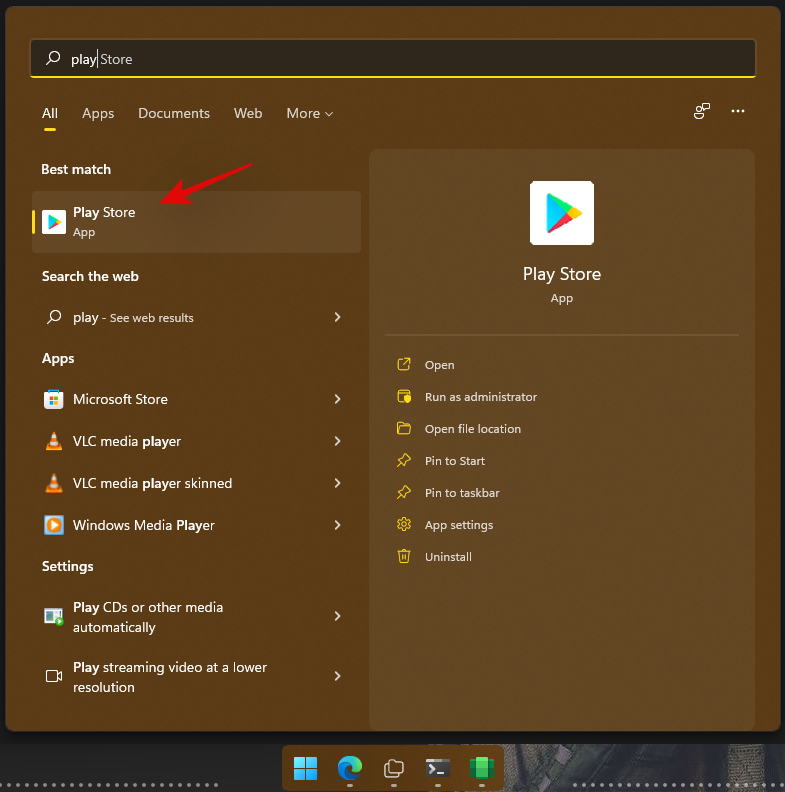
按 Windows 键,搜索 Play Store 并在您的系统上启动它。不要点击“登录”。
windows-11-install-gapps-and-play-store-batch-2-new-new-75-1

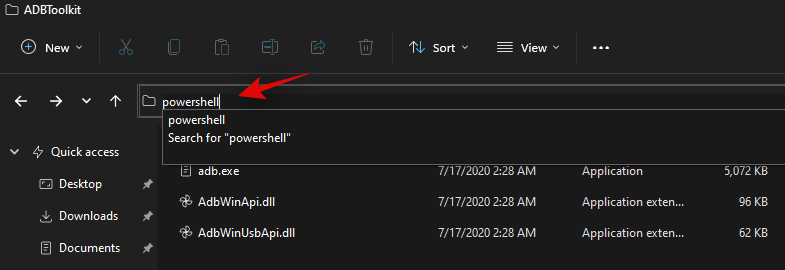
返回“ADBToolkit”文件夹并单击顶部的地址栏,输入“Powershell”并按键盘上的 Enter。 
windows-11-install-gapps-and-play-store-batch-2-new-new-76-1

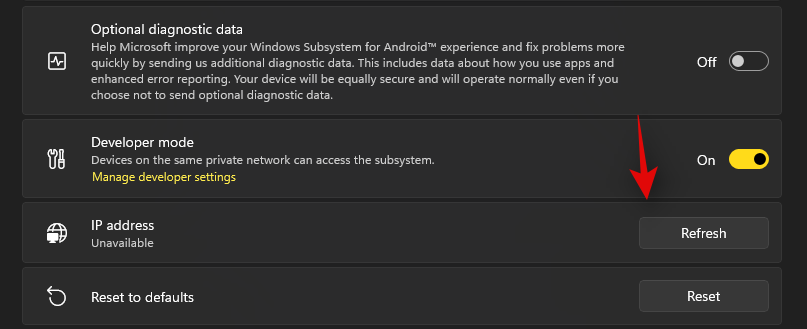
返回 Android 子系统并记下“开发人员模式”下方显示的地址。

windows-11-install-gapps-and-play-store-batch-2-new-new-90-1

注意:如果地址没有显示出来,只需点击 IP 地址旁边的“刷新”。

windows-11-install-gapps-and-play-store-batch-2-new-new-77-1

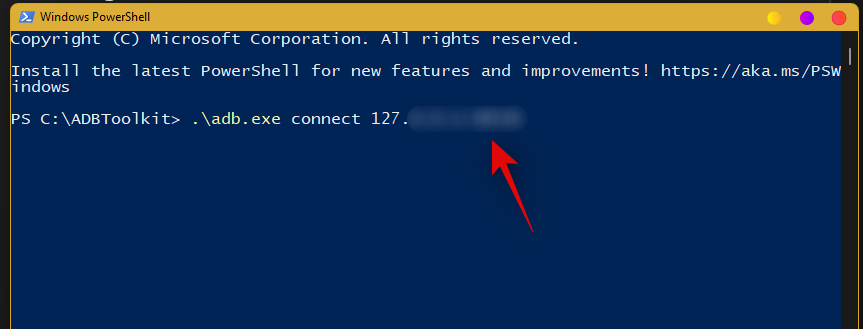
输入并执行以下命令。将 ADDRESS 替换为 Android 子系统中“开发人员模式”部分中显示的地址。 

.\adb.exe connect ADDRESS
windows-11-install-gapps-and-play-store-batch-2-new-new-91-1

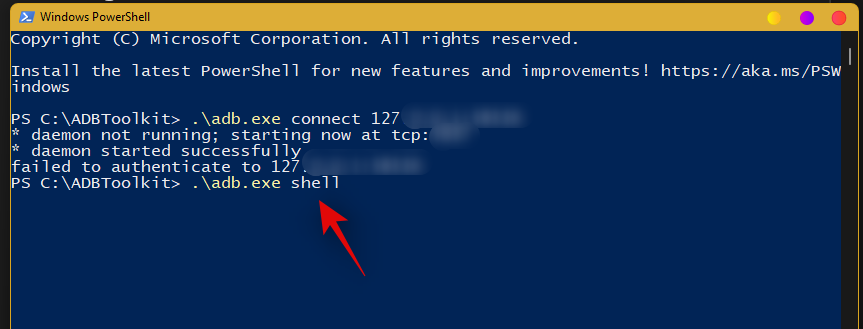
连接后,执行以下命令。 

.\adb.exe shell

windows-11-install-gapps-and-play-store-batch-2-new-new-92-1

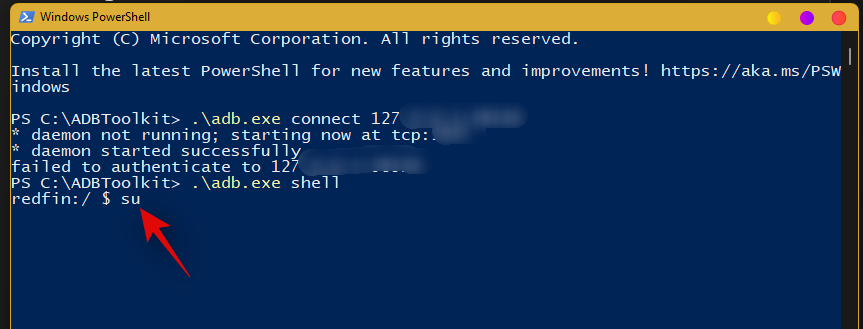
键入以下命令以获取 root 访问权限。 

su

windows-11-install-gapps-and-play-store-batch-2-new-new-93-1

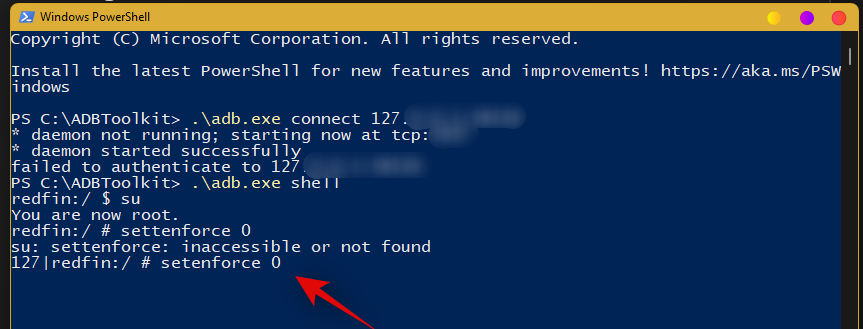
接下来执行以下命令。 

setenforce 0

windows-11-install-gapps-and-play-store-batch-2-new-new-94-1

现在返回 Play 商店并单击“登录”。

windows-11-install-gapps-and-play-store-batch-2-new-new-83-1

立即使用您想要的 Google 帐户登录。 

windows-11-install-gapps-and-play-store-batch-2-new-new-84-1

注意:这也会启用 Google Sync,默认情况下,它会将您的 Google 数据同步到 Windows,包括通讯录、日历事件、浏览器历史记录等。

登录后,关闭 Play 商店。我们现在需要恢复您的原始内核。打开适用于 Android 的 Windows 子系统窗口,然后单击“关闭”。 

windows-11-install-gapps-and-play-store-batch-2-new-new-86-e1635179280110-1

子系统现在将停止在您 PC 的后台运行。导航到启动驱动器上的“WindowsSubsystemForAndroid”文件夹并打开“工具”文件夹。 

windows-11-install-gapps-and-play-store-batch-2-new-new-87-1

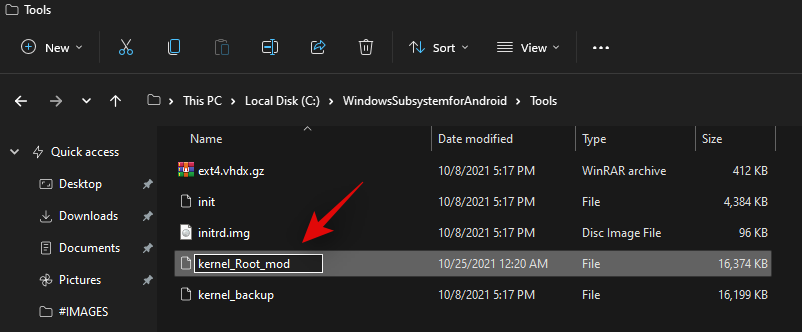
将“内核”文件重命名为“kernel_Root_mod”。 

windows-11-install-gapps-and-play-store-batch-2-new-new-88

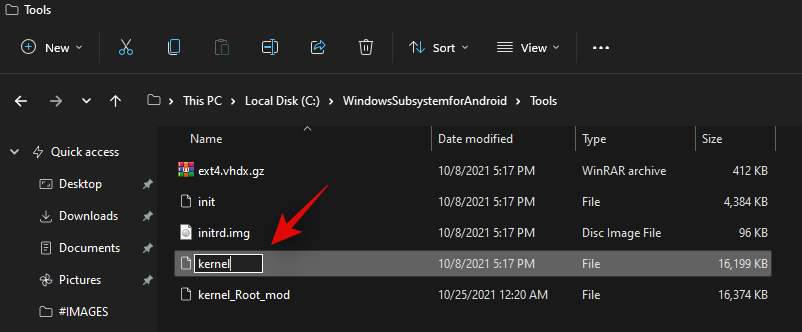
同样,将“kernel_backup”重命名为“kernel”。 

windows-11-install-gapps-and-play-store-batch-2-new-new-89

您现在可以关闭所有内容。我们建议您此时重新启动系统。重新启动后,您现在应该可以在使用 Google 帐户登录的情况下使用系统上的 Play 商店。 
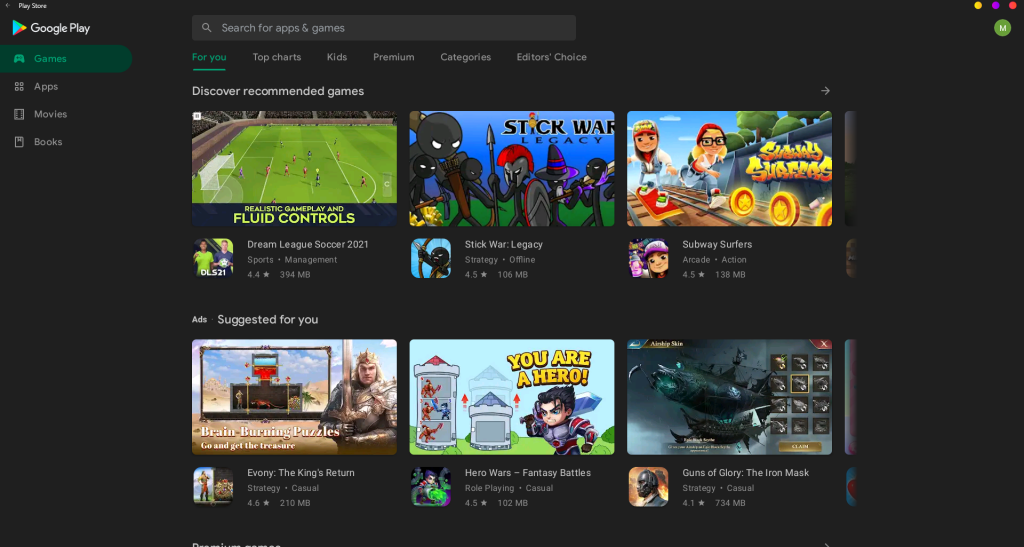
windows-11-install-gapps-and-play-store-batch-2-new-new-85-1

赞(0) 打赏
未经允许不得转载:Win 11系统之家 » 如何使用适用于 Android 的 Windows 子系统在 Windows 11 上获取 Google Play 商店和 Gapps

觉得文章有用就打赏一下文章作者

支付宝扫一扫打赏

微信扫一扫打赏